Tuesday, February 16, 2010

Trimming the sides and chines flat


Tuesday, Feb. 16: An easy task today. I trimmed the sides and the chines, which are attached to the sides, down to the designed final line, and flat across. That way the bottom will fit flush on the chines and sides. Then I trimmed off the excess length of the sides at the transom and at the stem. I did most of that with the electric plane, finishing with a hand block plane and finally a belt sander. I took it slowly, with frequent checks of the flatness, and avoided any major mistakes with the electric plane, which are all too easy to make.

My only regret is that my wonderful chine clamp inventions have done their job and will be needed no longer. I'll take off the hinges and save them for another project.

The next step is the bottom panel. It will require butting two lengths of plywood; by now that's no challenge. But I've already used more bronze screws than I expected. I ordered more, but delivery may delay attaching the bottom by a day or two. Meanwhile, I'll lay out the centerboard and rudder, which will each be made of two laminations of 12 mm (just about 1/2") plywood.

Monday, February 15, 2010

Chines glued and screwed

Monday, Feb. 15: I said Saturday I wouldn't declare total victory over the troublesome chines until they were epoxied and screwed in place. Today, with the help of Capt. JT, we got that done. We also glued and screwed the sides to the transom permanently.

I thought I would be at this point two weeks ago, but the important thing is the bow, stern, and sides are properly built and installed. No pictures today. It looks just like it did a couple of days ago, but now it is permanently sealed with epoxy.

Now I can finally move on to the next step: make and install the bottom. Then I'll have at least the shell of the hull done. Many more steps before it can be called a boat.

Saturday, February 13, 2010

A Good Day


Saturday, Feb. 15: I enjoyed today more than any other so far in the project. The result was I fit the chines in place, but getting there was the fun part.

The chines (or more properly, the chine logs) form the inside of the corner between the sides and the bottom. They need to fit against the stem and the transom, which angle in both directions. The tricky part is that they must bend both around the boat’s side and also edgewise as the bottom rises near the stern. They must also twist as the boat’s sides do, going from bow to stern. And if that's not enough, the chine logs actually need to be about 2” longer than the space for them along the bottom, because of course the stem and transom angle away from each other. That last feature makes it not only hard to fit them in but also to figure how long to cut them.


Two weeks ago I sweated the chines into place over the course of two days with the help of my friend Capt. JT. But in case you missed or forgot that sad chapter, our effort came to grief because the stem angle was wrong and one of the chines was cut too short. Work since then has been remediation.

Correcting the stem angle moved the chines back a little, but not enough for the short chine to gain its deficiency. I had to use new pieces for the chines this time around.

I started the day by making short pattern pieces for the bow and the stern ends of the chine, so I would know exactly what angles the cut them. I cut the bow ends of both chines to those angles.

Because they bend so many ways at once, I didn’t know if I would be able to fit the chines without help. But I did know there had to be a better way to hold them in place while they were being installed. During one of my middle-of-the-night musings a way to do that occurred to me. Now, I have learned over and over again that great ideas in the middle of the night usually are not worth much in daylight. But my idea was to make clamps to hold the chines in place against the side, and also secure their vertical position. I went to the hardware store for a 2 by 4 and four strap hinges. I sawed the 2x4 in half lengthwise and cut the two lengths into four matching pairs two feet long. I joined each pair at one end with a strap hinge, and cut a notch out of one side of each pair to match the cross section of the chine. Clamps done and ready to use. To use a chine clamp, I hang the hinged pieces over the boat with the notch over the chine on the inside, and clamp the two ends together, pinching against the boat’s side panel. Not only does it hold the chine in place, but also I can fine tune the height by tapping the top or bottom of the chine clamp. My idea works even better than I'd hoped, and I’m so pleased with myself I could spit.

I put the bow ends of the chines up against the stem on each side, and using my chine clamps I gradually worked toward the stern, screwing the chine in place on alternate sides, checking frequently that the bow stayed on center. Compared to a struggling two-man job last time, it was a straightforward process to do it alone, thanks to my magic chine clamps.

As I approached the stern on each side, I let the uncut chines run over the transom, measured how long they needed to be, and cut them by hand to the right angle and length, using the short template piece as a guide. Then I loosened the sides from the transom, dropped the chines into place, reattached the sides to the transom, and finished screwing the chines to the sides;finishing the job just as I ran out of daylight. I won’t claim the fits were perfect, but close to it.

Everything went well today, and I am well pleased to get the chines to a good dry fit. I won’t claim total victory over them until they are epoxied in place.


Wednesday, February 10, 2010

Bow permanently assembled

Wednesday, Feb. 10: Today was the first day this week I could do any work, and I won't have another until Saturday. Before torturing the chines into place I needed to have the sides firmly epoxied and screwed to the stem, so that was all I did today. It may take until Saturday for the epoxy to cure: 55 degrees max. today.

One followup comment about Howard Chapelle. As respected as he was as a maritime historian, he appears to have deserved less respect personally. Writing in 1936 about Bahama sharpshooters and dinghies, he says, to his disgrace, "The great loss of life that occurs periodically is not due to the poor models of their boats, nor, largely to the weather and water conditions, but to the carlessness and shiftlessness of the negro sailor. The boats are rarely painted, are usually leaky, and invariably have rotten gear; hence they are often in trouble. The Bahama craft were at one time a fine lot, as the early sharpshooters and turtle-schooners still afloat show, but the increasing number of colored builders and sailors has caused the various types to degenerate". You could argue that he was a man of his times and that such garbage was typical, even fashionable, 75 years ago, but I would rather let his words speak for themselves. It seems to me you are responsible for your own character, whenever you live. And if you are writing a history, you need to be aware of the follies of your own times just as much as the follies of the time you are writing about. Or else you deserve what you get. I hope he eventually rethought those words.

Anyway, next step: wrestling with the chines.

Sunday, February 7, 2010

Naval Architect Howard I. Chapelle

Super Sunday, February 7. Since there has been no boatbuilding for three days now, two for weather and one for my youngest granddaughter’s first birthday, I’ll give some background about Howard I. Chapelle, my skiff’s designer.

My introduction to Howard Chapelle, came in the form of his wonderful book, The History of American Sailing Ships, a gift from my girlfriend in the 1960s. I read and reread that book until it fell apart, and it started me on a lifelong interest in boat and sailing ship designs, and in Chapelle’s books in particular. I have added eight more of his books over the years including a short one on Chesapeake Bay Crabbing Skiffs. And speaking of lifelong interests, I’ve been married to the girlfriend for 45 years.

Chapelle (1901-1975) had an unusual and varied career in maritime businesses. Building on a foundation of practical experience, he eventually became the unquestioned leading American historian writing about maritime history and boat design. Starting as a teenager, he apprenticed as a shipyard worker and designer for several shipbuilders. By the 1930s he had his own boatyard and design business in Cambridge, Md., on the Chesapeake’s Eastern Shore. When that business dried up in the depression, he worked on a New Deal project documenting the vessels in the American merchant marine. During the WWII years he was building ships for the merchant marine. He resumed his design career after the War, but his research background led to a Guggenheim fellowship to study Colonial ship building in England, and he later did work designing workboats for the Canadian and Turkish governments. Throughout, he continued to document the fast-disappearing sailing workboats on the Eastern seaboard, especially on the Chesapeake. He wrote at least a dozen books and monographs about everything from clipper ships to Greenland kayaks.

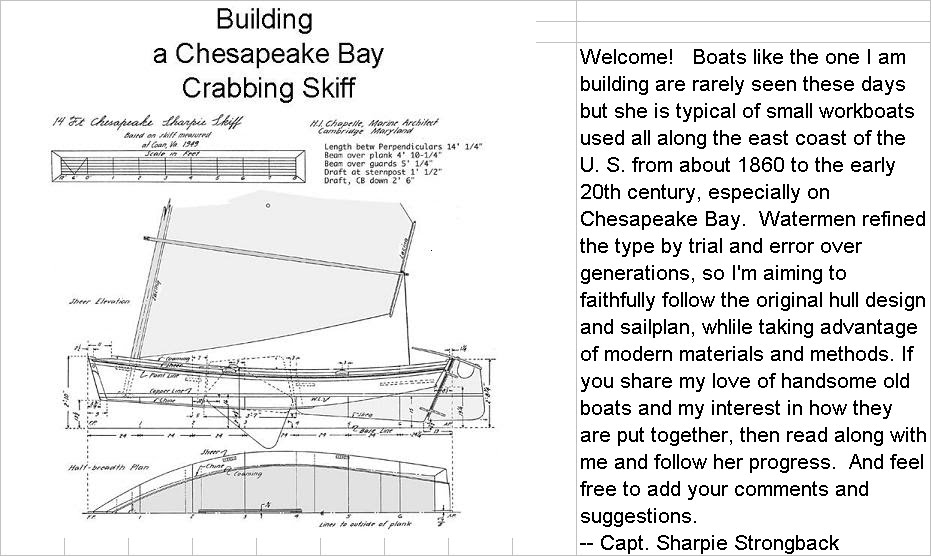
The 14’ sharpie skiff I’m building was designed by Chapelle in 1949, based on a workboat he measured at Coan, Va. I would guess there have been any number of boats built to the design, but I don't know for sure. It may have been his smallest design, but Chapelle was a strong advocate of simple small boats as the best way for sailors to get on the water.

In 1957 Chapelle was appointed curator of the Transportation division of the Smithsonian Museum of History and Technology, overseeing the huge National Watercraft Collection, and continued there until his retirement in 1971.

I was lucky enough to meet Howard Chapelle and spend some time with him 1971. I stole a morning on a business trip to D.C. to visit the Smithsonian specifically to see the collection of shipbuilders’ half-models which I remembered seeing on a previous visit years before. I even had with me Chapelle’s book-sized catalogue of the collection. But I was disappointed not to find the models on display. An attendant told me the models had been put in storage upstairs to make room for other displays. He seemed surprised anyone would be so interested in the half-models, but he telephoned to see if someone would take me up to the storeroom. The someone was an elderly gentleman who turned out to be Chapelle. He invited me up to his office to wait for his assistant to return from lunch and show me the models. I spent the better part of an hour with him, talking about sailing ships and looking at drawings he was making for what turned out to be his last book, The American Fishing Schooners. He was interested in a large fishing schooner, still working, which I had seen on the north coast of Newfoundland the year before.

Chapelle mentioned that after he finished the book about fishing schooners, he intended to revise his 1936 book Boatbuilding, updating it to include modern materials and methods. He never got to that, and I wish he had; it would have been useful on my current project. At least his comment gives me comfort that traditional materials and methods are secondary to the boat design itself.

Thursday, February 4, 2010

Sweet Success

Thursday, Feb. 4: Yesterday and today were both shortened by other
obligaitons, but they were the most satisfying of the whole project so far.

Yesterday the rebuilt side panels went back on the molds and were secured in place. Most of the work time was spent making a brace to hold the stem at the correct 20-degree angle, plumb, aligned with the boat's centerline, and at the right position fore and aft.

Today I finished positioning the stem, and after checking it again and again I pulled the sides together at the bow to see how much modification had to be made to the stem to make it fit so that the sides pull in just enough to keep their curve continuous right to the bow, without straining to lie flat on the stem. It turned out the stem bevel angle was nearly correct at the lower (sheer) end, but the angle at the chine had to be narrowed quite a bit. Yes, that's right: the sides come in at different angles at the top and bottom of the stem, even though the sides are flat and the stem is straight. But after all that worrying and measuring, the electric plane made short work of trimming the excess angle and fitting the stem to the sides.

Once I was satisfied with the fit I put a couple of screws on each side panel, securing it to the stem. Then I checked again that the bow was centered, at the right angle of rake, at the right height, and at the right distance forward. Eureka! Everything checked as closely as could be measured. In the picture on the left you can see the finished bow, as well as the butt joint in the starboard side where it was cut off the first time around. By the way, the butt joints there, and the ones amidships which joined the two original 8' panels, curve just as fairly as if they were one continuous piece of plywood.

Finally today, I slipped the starboard chine stringer into place between the side panel and the molds, and found that with the reconfigured bow, the chine piece which was cut 1/2" short before, is now long enough, and may even fit in just right without further cutting, except for slight re-beveling where it meets the stem at the bow. All in all, a day when everything went right.
I went ahead and put the rest of the screws into the stem, and I would also have liked to glue up the sides to the stem with epoxy today, but I ran out of time.
The weather forecast for tomorrow is windy, with rain late in the day. If I have enough work time, I'll glue up the stem and sides, and see if I can get the chines screwed and glued. Then I can finally start to think about the next steps, trimming the sides and chines so they are flat across and follow fair curves, in preparation for putting on the bottom.

Tuesday, February 2, 2010

Back to having fun again

Work outside has been limited by rain, but since my last post I have been rebuilding the bow, after seeing that the stem was cut too wide to an unacceptable degree (no pun).

Since I knew I'd have to chop off the sides near the bow, on Sunday I first carefully measured and marked the position of the sides on the molds, to ease the task of returning them to the right place when the repair was done. That was a painstaking and time consuming process, and it was all I got done that day.

I did make a discovery Sunday though which explained why the stem didn't fit originally. When I first set up a guide pattern for the stem, early on, I somehow set it at a rake angle of l6 degrees when it should have been just under 20 degrees. As a result, the sheer end of the stem, which is the lower end since the boat is being built upside down, was unaffected by that mistake; but the upper end of the stem, the chine end, ended up too far forward. As a result, the side panels had to make a sharper bend there to sit alongside the stem. Sure enough, when we had mounted the sides to the stem and bent the assembly around the mold frames, it was the chine end which was strained and distorted. The lower sheer end of the stem was still too wide, but only by a little bit. Evidently, I had measured the stem bevel angle at the sheer end.

Monday I faced up to the inevitable, and cut off the sides alongside the stem with a sawzall, then removed the sides from the molds and made a clean straight cut on each side halfway between mold #1 and where the stem had been. I took the sides inside the house and laid them flat. I rough cut fresh pieces of plywood to replace what had been cut away. The fresh piece for the starboard side was laid under the pattern originally used for the side panels, and the chopped off side panel was laid on top. After the side panel and the pattern were aligned, I traced the missing part onto the fresh piece, and did the same thing for the port side panel.

Today I cut out the replacement bow pieces on the band saw, laid them down with their matching side panels, and made 4 1/2" butt straps and epoxied them over the joints. I secured the pieces together with strapping tape so they wouldn't shift as the epoxy cured.

Also today I salvaged the stem, thus saving a nice piece of white oak. I dug out the bronze screws which had secured the ill-fated side panels before. Since they had been screwed in while the epoxy was still wet, they were impossible to unscrew. I had to chisel the wood away around each one until I could grab the end with vise grip pliers. Even then several of the screws broke off, leaving the tip about 3/4" in. I used the electric plane to clear away the plywood remnants. To avoid hitting embedded screw fragments when I get to cutting down the stem bevel, thereby ruining a plane cutter, I drilled out the screw holes where screws had broken off.

Last time around I secured the sides to the stem and bent the assembly around the molds, following the method recommended in my boatbuilding books, only to discover the stem was wrong. This time, though, I'm going to clamp the sides in place on the molds, brace the stem at the right angle, pull the sides together at the bow, and see how the stem fits, making whatever adjustments and trial fits are needed.

I have learned from this sub-adventure not to epoxy a piece in place until I'm sure it's right, because once two pieces of wood are bonded and the epoxy sets up, even without screws, the bond is stronger than the wood; you can chop the pieces up if you need to, but no force on earth can separate them. That's the good part and the bad part of epoxy.

It remains a mystery how to calculate in advance the angle two sides make at the stem, given the flare of the sides, the rake of the bow, and the angle of the bow at the waterlines. There must be a method, at least for the simple sharpie hull, but I have not found it or figured it out. It's trial and error for me.

I joked a few days ago that the difference between an amateur boatbuilder and a professional is the number of clamps he has. That's funny just because it's obviously not true. But for all my woes, two advantages I do have over a professional are time and accountability. I answer only to myself and I can take however long is needed to do a job to my own satisfaction. That counts for something.