
An anonymous comment on my last post is worth pointing out:
Cap'n, if you'll re-lace your sail to the mast, not by whippng the lacing in a continuous spiral, as I see it in your photo, but instead come around, through a grommet and back around the front of the mast each time, you'll find that your sail hoists and can be pulled down far more easily.
Right you are, anonymous. Pete Culler, in his book Skiffs and Schooners alleges that around-and-around lacing will jam on the mast, while around-and-back lacing won't. I initially laced the sail around-and-around just because Chapelle's sail plan showed it that way. It did tend to bind on the mast when hoisting, though not when lowering. I tried it the way you suggest and I agree it it makes hoisting easier. Underway though, around-and-back lacing tends to pull the luff of the sail to one side or the other at each grommet. The luff needs to be hoisted tight, but the lacing need not be tight.
With a sprit rig, lacing the sail to the mast has to be done just right to avoid a tangle of lines, regardless of the lacing style. What causes the problem is the tackle for the snotter holding the forward end of the sprit. Each segment of lacing will snag on the tackle when hoisting or lowering the sail unless each one is lifted over the tackle. On my boat, the snotter goes from the end of the sprit to a block seized to the mast and down to a cleat at deck level. The snotter will tangle the lacing unless before hoisting it is rigged up inside all the laces which will end up above the tackle and outside all the laces below it. With a lapfull of laces and snotter, it is easy to make a mistake. What I have settled on is to attach all the laces except the bottom three grommets, then run the snotter up and back down inside the laces and cleat it loosely, then hoist, then lace the bottom three grommets. The boat is small enough that I can reach them after the sail is hoisted. Finally, I take up on the snotter and secure it.
I can now well imagine what a welcome invention sail track was. I may convert my sail to slide up and down on a track.
Saturday, April 2, 2011
Thursday, March 10, 2011
Notes I wrote but didn't post at the time
I just noticed that I wrote blog notes one day last month but never pulled the trigger. So here is a report out of sequence:
Feb. 11
Yesterday, to make room to step the mast, I cut down an overhanging tree branch, and took down the canopy which had protected me from the sun and the boat from the rain (mostly) since August. Without the blue cover overhead, the paint color shows much more distincly green, as I'd intended.
Of course, as soon as I had the canopy down it started to rain.
I stepped the mast for the first time. It was even easier than I had expected to put the heel of the mast against the step, walk it up, and drop the tenon into the step, and secure it to the forward thwart with the stainless clamp which was made for that purpose. So easy, in fact, that I believe I will be able to lower the mast and row under low bridges. That will give me access to spots I have not explored before. The next calm day I will hoist the sail and check out the rigging.
Today I gave the inside bottom a finish coat of paint, filled all the little pinholes in the deck, and repainted antifouling red paint below the waterline which had been streaked by last week's paint disaster.
/
As I was working this afternoon, a passerby in a little outboard inflatable came close enough to compliment the look of the boat. Anyone who wants to admire my boat is a welcome visitor, so I invited the fellow ashore for a closer look. Turns out, he is a shipwright who just finished building a 65' catamaran in Honduras, so I began to take his compliments seriously. He loved the boat and said I've done a "fantastic job". A better man would have kissed him.
My #4 granddaughter, whose job it will be to christen the boat, will celebrate her second birthday tomorrow, but I'll be back to boatbuilding Sunday.

Sea trials
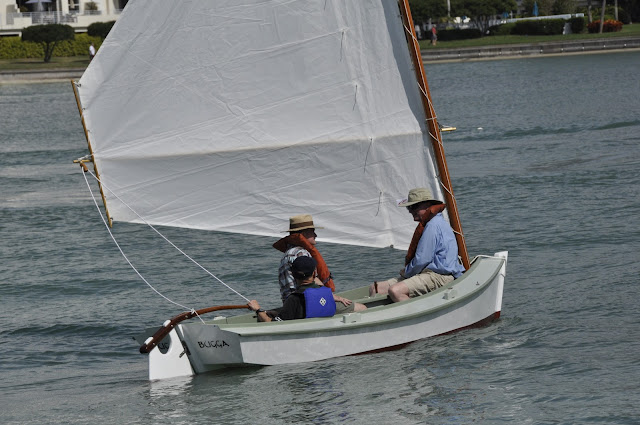
We launched last Saturday and spent the day taking many friends and family out for short sails. Sunday and Monday I had a chance to get a better feel for what kind of boat she will be.
I built the boat in hopes to have a comfortable day-sailer to gunkhole the inland waters around my home in the Tampa Bay area. I want to be able to take along an adult or two, or a child or two or three. I'll admit, having a pretty classic boat will add a lot to the pleasure. The actual building took a while, but I enjoyed every bit of it. The boat's designer was a famous naval architect, so I had a certain degree of confidence in what I would end up with, but now I can report what I learned the first few times I've sailed her.
Stability- I've never sailed a sharpie hull before. By reputation, sharpies are fast, at least under the right circumstances; what I did not know was whether the boat would have enough initial and reserve stability to be a comfortable, easy sailer. Now having sailed in a range of conditions from very light air to gusty 20 kts, I find that she does heel down to the rail easily, but the splashboard/deck keeps the boat dry. I keep the mainsheet in my hand, and slackening it in a gust brings the boat upright immediately. There is plenty of stability to move around the boat while rigging or docking. I can even stand on the deck at the bow with no one else aboard, to fiddle with the rigging, without the boat wanting to roll over. I'm going to fit a pin extending down from the center thwart, to snub the mainsheet. I don't think it will ever be necessary or desirable to cleat the sheet.
Carrying capacity- Though she's small, three heavy people do not seem to overload her. She could easily carry and adult and three or four children. There's room for them all, too, With the two thwarts and the sternsheets. Having said that, she is much livelier when singlehanding.
Speed- I don't really care about speed. It does not take much wind to drive her to hull speed. Sailing alone, my GPS showed speed of 4-5 kts in only 10 kts of breeze, on a close reach. The one time I sailed in about 20 kts of wind, she took off like a rocket; not quite planing, but I'm sure she would plane on a reach in that much wind. She does not seem to lose stability at higher speed, like a round-bottomed dinghy does.
Sail trim- The sprit rig with a club at the clew is as novel to sail as it is to look at. The sail does not behave like a mainsail- more like a jib, but not quite that, either. The sail is enough different from anything I've sailed before, it was initially a bit difficult to sense the direction of the wind. When I sheet it in, the leech seems to snug up more than the foot. At first I thought the sprit needs to be attached to the club lower, but as I think about it, perhaps the snotter, the line which secures the sprit to the mast, needs to be lower. In any case, it does not seem to be necessary to sheet in tightly going to windward. The top 2/3 of the sail is quite flat even when the foot looks slack. And keeping the sheet a bit looser seems to keep more power in the sail. She tacks through 90 degrees, so I have no complaints there.
Mast bending- The unstayed mast is 3 1/4" at the partners, and only 1 1/4" at the head, so I expected the mast to be very whippy. It turns out not to bend much at all.
Sailing trim- The weather helm is light. With the centerboard half way up, weather helm almost disappears and she does not seem to make leeway going to windward. As a bonus, the draft with the board part way up is only about 18". One oddity is that she will self steer downwind with the board all the way up and the tiller fixed. Not many boats will self steer on any point of sail, least of all downwind .
Tacking and tracking- The large skeg has the same effect as a long keel: the boat tracks well off the wind, and is not inclined to round up in puffs going to windward. The downside is that she does not turn on a dime. The first couple of times I tacked, I nearly missed stays. It's necessary to put the helm down gently, get some turning momentum, then go ahead and put the helm to lee and complete the tack.
Pounding- The knock on flat-bottomed boats is the tendency to pound, and indeed she does pound if, for example, I go over another boat's wake when the boat is upright. But when heeled down even a little, there is little or no pounding.
Handiness- I have not mastered the process of hoisting the sail yet. The lacing tends to bind because friction with the mast tightens it as the sail is hoisted, even when the lacing starts slack. Pete Culler's book Skiffs and Schooners recommends lacing alternatively around to the left and around to the right, instead of around and around. Supposedly the lacing does not jam that way. I'll have to try that. When raising or lowering the sail, it is also necessary to lift the laces over the snotter tackle. On another subject, the boat beaches easily even with the 13"-deep skeg. By the time that touches bottom, the stem is on the beach, at least on beaches in this area.
Rowing- She is no pure rowing boat like my Gloucester Light Dory, but she rows easily from either of the two rowing stations. The oars tuck inside the forward oarlocks so they can be left shipped and on deck. The ability to row when needed without any set-up makes it handy to move the boat around for whatever purpose, to keep moving in a calm, or to get under a bridge where winds inevitably fail.
Rotating mast- Because the mast is unstayed and rotates freely, the sail will swing straight downwind whent he sheet is released, on any point of sail. It will even swing around ahead of the boat when going downwind. That novel feature allows me to effectively put the boat in neutral whenever I want to attend to a chore away from the tiller. I believe that is the way crabbers used the rig to run down a trot line, with the boat drifting pretty much on her own.
So it turns out the boat is all I could expect of her, and then some. She's a pleasure to sail, row, and to look at. I've got a lot to learn to get the best out of her, but I can see that she'll be a good friend.
One more thing- I think this little boat is absolutely beautiful. Maybe I've just been looking at her so much as she came together that naturally she looks just how a boat should. Nevertheless, the hull's lines and the rig give her a balanced, graceful, capable appearance that makes me feel good every time I look at her. My hat's off to her designer, Howard I. Chappelle. I have many pictures from last Saturday's launch festivities, and I'll post some soon. You can judge for yourself.
Saturday, March 5, 2011
Launch Day
We finally got her launched today. More pictures and comments later.
 The Captain's granddaughter did the honors.


Wednesday, February 16, 2011
Done
To the extent any boat is ever finished, Tugga Bugga is done. Sure, there is touch-up, improvement, and accessorizing to do: but that will transition into maintenance.
We'll have a modest christening party March 5th. Between now and then I may enlist help to get her over the seawall and do a bit of "tank testing". I'll continue to add notes here as I trim her up and fiddle with improvements as the need appears. And I'll post a gallery of photos both ashore and afloat. For now, a sunset picture:

We'll have a modest christening party March 5th. Between now and then I may enlist help to get her over the seawall and do a bit of "tank testing". I'll continue to add notes here as I trim her up and fiddle with improvements as the need appears. And I'll post a gallery of photos both ashore and afloat. For now, a sunset picture:

Monday, February 14, 2011
Rigged
The wind today was light out of the west, which is what I was waiting for to check out the rigging. I laced the sail to the mast, rigged the sprit and club, and hoisted the sail.
I have followed Chapelle's plan for the rig as exactly as possible, and read and thought a lot about the sail and rigging. But when I set it up in real life there were many surprises. I found that it is necessary to have the clew laced and tied to the club before doing anything else. The sprit and mainsheet block need to be secured to the club before hoisting the sail, but to do that the forward end of the sprit needs to initially hang way over the bow. Lacing the luff to the mast is straightforward. Once the sail is hoisted the downhaul and lacing line are secured, the sprit is tightened and its control line, the snotter, is cleated down. That will take a lot of work right up forward; I hope the boat is steadier than some dinghies I've sailed, so setting sail is not an athletic feat. Whatever- I'll find out soon enough.
I had fixed the mast step in place temporarily because a small error would cause the mast to rake to much or too little. It turns out I had it just right. I was asked to show a photo alongside Chapelle's sailplan:

After unrigging, I had time to give the inside trim and the coaming a finish coat of paint. The rub rails remain to be finished. I'll fill the screw holes and give them a couple of coats of paint. After that she'll be ready to sail. Not row though; oarlocks need to be made and attached for two rowing stations. When the boat is in the water I'll be better able to decide how high the oarlocks need to be for the oars to clear the coaming inboard.
Wednesday, February 9, 2011
Rub Rail on, and More Painting
Although the day started in the 40's, it soon warmed up enough to paint.
I screwed the rub rails on, working from bow to stern, using a pair of clamps to bend the rails to take the strain off the screws.

After I started to screw on the first rail, the forward end just didn't look right- it stuck out to the side too much. I had not shaped the end with enough taper. So I unscrewed it, recut the end, and cut the other rail to match. Once the rails were fully attached, I trimmed off the excess at the transom. A straightforward job, but one with plenty of opportunity to botch it, so I did it carefully. The screw holes need filling, and the rails will get two more coats of paint.
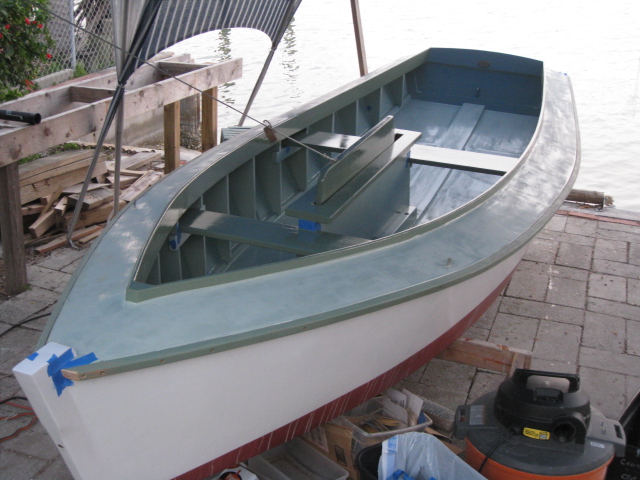
The deck will need a bit of filling and a second coat of paint, and the bottom inside can use a second coat, so I prepped them with sanding, vacuuming and wiping down with a damp rag. But the actual painting today was the darker green trim on the centerboard and its case, the thwarts, including the stern sheets planks which have not yet been installed, and the coaming.
Getting the rub rail on and the coaming painted starts to show the boat's finished appearance, even with the deck sanded. I like the contrast between the two shades of green.

I screwed the rub rails on, working from bow to stern, using a pair of clamps to bend the rails to take the strain off the screws.

After I started to screw on the first rail, the forward end just didn't look right- it stuck out to the side too much. I had not shaped the end with enough taper. So I unscrewed it, recut the end, and cut the other rail to match. Once the rails were fully attached, I trimmed off the excess at the transom. A straightforward job, but one with plenty of opportunity to botch it, so I did it carefully. The screw holes need filling, and the rails will get two more coats of paint.
The deck will need a bit of filling and a second coat of paint, and the bottom inside can use a second coat, so I prepped them with sanding, vacuuming and wiping down with a damp rag. But the actual painting today was the darker green trim on the centerboard and its case, the thwarts, including the stern sheets planks which have not yet been installed, and the coaming.
Getting the rub rail on and the coaming painted starts to show the boat's finished appearance, even with the deck sanded. I like the contrast between the two shades of green.
Subscribe to:
Posts (Atom)

