Wednesday, March 31, 2010

A little work done, and mystery ship identified

.

Wednesday, Mar. 31:  I had promised a friend to help him with a home remodeling project today, but he had to delay the starting time so I was able to get in an hour or two of boatbuilding.  I worked with the electric plane to take the sheer down to the right level and the right angle for the deck.  The plane is a hungry and unforgiving tool, and it is easy to cut away too much, so I took it extra slowly and carefully.  I got the starboard side just about done before I was called away.  We are having a stretch of perfect weather: sunny, dry, and in the 70's.  It was a pleasure to be working outside.

We have identified the sailing ship pictured yesterday, thanks to today's newspaper.  It is a replica of Columbus's Pinta.  There is a Columbus Foundation in the Virgin Islands which built a replica of the Nin~a, using trraditional methods and hand tools, and a somewhat less traditionally built replica of the Pinta.  No Santa Maria yet.  They are in town until next Monday, and docked nearby.  We will try to find time to visit them before they leave.


Tuesday, March 30, 2010

Finishing the sheer clamps, And a strange visitor.

.

Tuesday, Mar. 30:  Much of today was consumed with a trip to the Fiberglass Coatings store for a resupply of epoxy and all the fixings, so the only thing I got done was removing the sheer clamps and permanently refastening them with screws and epoxy.  I did such a neat job of it they look just like they did yesterday, so no photo op.

But Mrs. Strongback did snap a picture worth showing.  I was not home, but this was the second of two strange vessels which came by the house:


The other was smaller, and had four masts: lateen rigged on the two after masts and square on the forward two.  I can't recall ever seeing a picture of a ship and rig like this.  It looks somewhat like an arab dhow.  Note that there are no footropes on the main yard.  The large square sail must be furled with brailing lines from the deck.  Or maybe the sail is never set at all.  Maybe a movie prop?

Monday, March 29, 2010

Fitting the sheer clamps

.

Monday, Mar. 29:

 Last Friday, after the epoxy fastening the keelson had cured, I continued work on the inside of the hull.  For reference I marked on the bottom and sides all the design sections, which are spaced every two feet. I marked off where the centerboard trunk slot will be.  The centerboard trunk and the thwarts are the main structural pieces remaining, but I want to get the sheer clamps fitted for two reasons.  They will stiffen the hull sides and support it when I turn it over, which I expect I will be doing often.  And they will provide something to brace temporary supports which will hold the hull to the proper width until the thwarts are put in.  So I cut out two long pieces of clear fir, to serve as the sheer clamps.  Using cutoff pieces, I fiddled with the bevel and rake of the ends until I had patterns for fits against the stem forward and the transom aft.  I also recorded the compound miter angles which produced those patterns. And having learned how easy it is to get confused with miter cuts, I marked the pattern pieces which side is up, and which side of the saw blade to put the piece.  Finally, I cut the bow ends to the right bevels.

Saturday was a no-boatbuilding day, as I helped my son lay out a playground area in his backyard.  Sunday was rainy.

Today, two friends stopped by to "inspect" the boat, and I drafted them to help run the mast blank (a 20' 4x4 of douglas fir) through the thickness planer to smooth the four sides.  Since I bought that piece last December it has been inside the house, and its weight has gone from 95 pounds to 75 pounds, just by drying out.  The finished weight, after it is tapered and sanded, and dries some more, should only be about 30 pounds.  Now when I get a chance I can mark the taper lines on all four smooth sides, and make the initial taper cuts with a skil saw.

After my helper friends left, I continued work on the sheer clamps.  Sunday's rain had washed away my reference marks on the inside, which for some bad reason I had made with a red Sharpie pen.  But the corresponding marks on the outside, which were in pencil, were still there.  So I went around and remeasured and marked new lines on the inside where the sheer clamps should lie.  Then I could proceed with fitting the sheer clamps.  The way to fit a sheer clamp "by the book" which has to fit exactly between the stem and the transom, is to clamp the bow end in place and fasten or clamp it in place along its length as far as possible, letting the other end overhang the transom. When you can't go any farther, mark where the sheer clamp and side line up, and measure how far it is along the side from the mark to the transom, and then remove the piece and cut it to that length.  I didn't have the courage to do that, fearing that somehow it would cut it too short.  Instead, I gradually trimmed the transom end until it fit. 

That necessitated several trial fittings, but peace of mind is worth a little extra work.  When the piece fit and was clamped in place, I screwed it to the side.  Its mate on the port side went much quicker.  At that point I had both sheer clamps dry fitted.  I will still have to remove them and reattach them with epoxy.  But in the meantime they add a surprising amount of rigidity to the hull.


The last thing I did today was make a couple of temporary braces to hold the sides out to the correct width at station 2 (4' aft of the stem) and station 4 (8' aft of the stem).  The desire of all the longitudinals (chine logs, sheer clamps, gripe and keelson) to straighten out have the effect of drawing the ends down and the sides in.  So the temporary braces are needed to push the sides out by about two inches to restore the hull to its proper shape.  I had planned to also put a brace at station 6, but with the other two braces in, the beam there was already just what it should be.


Now I have a rigid hull which will hold its shape until I build the structural pieces inside: the thwarts and the frames and deck.  A nomenclature note about the "deck": it will be only 6" wide.  The plans call it a "covering board", and "washboard" is also a common word for a narrow deck.  But thinking ahead, other people sailing with me might not recognize those words; everyone knows what a deck is, so "deck" it will be.

Next up: the centerboard trunk.
Thursday, March 25, 2010

Finishing fitting the keelson

.


Thursday, March 25:  Today's job was to screw and epoxy the keelson in place, but there were several preliminaries which had to be done first.  I built a low sawhorse to support the boat in place.  Under the stem I set up jack stands with a plank between them.  And I blocked up the skeg to the right height.  I measured and marked carefully where the centerboard slot in the keelson will be, to know where not to put screws. I notched the #4 mold for the keelson so I could clamp it in place to hold the hull shape while fastening the keelson.  And I taped off the area on the inside bottom where the keelson is to lie, to keep the epoxy from making a mess.  Finally I wet out the keelson and bottom with unthickened epoxy, mixed up a thick paste of epoxy and spread it on the bottom, and laid the keelson in place.  I screwed it down, working from the bow aft, and when I reached midships I was able to clamp the mold in place.   The keelson is now laminated to the bottom panels and to the gripe and skeg.  The centerboard trunk will be the last piece of the backbone.  That's it: a day's work, at my pace. One reason each step takes so long is my reliance on epoxy adhesive; it takes a while to mix and apply, and once a piece is fastened with screws and epoxy, I need to leave it alone to cure.  Makes for slow progress, but it's worth it to get a strong and long-lived boat.


Wednesday, March 24, 2010

Starting on the inside- fitting the keelson

.

Wednesday, March 24:  Yesterday I pulled the hull off the molds with the help of two friends and turned her over.  Turns out, the shell of the hull is still very light, so it was no job at all. It was a particular pleasure to see the boat right side up for the first time.  I had other obligations, so I got nothing further done that day.

Today I started work on the inside.  The first order of business is to make and fit the keelson.  I gave the inside a light sanding and carefully marked the centerline.  The bottom is in three pieces, joined by butt straps inside, so I needed to cut away the butt straps where the keelson lies.  Either that or notch the keelson, which would have weakened it.  Cutting the butt straps was awkward, and I made a messy job of it.  Epoxy will hide the poor work.  Then I pulled out my last remaining whole 2x6x16 clear fir board from its home inside the house, and fashioned it into the keelson.  I traced on paper the shape the forward end makes, a chopped-off V, and transferred that to a cutoff piece of 1x6 to make a pattern, adding the flare out and forward to meet the chine logs and the stem. The pattern fit into the boat, so I knew I had the shape right, and duplicated it on the forward end of the keelson piece.  Then I measured the angle the bottom makes with the transom and set the miter saw to that angle.  I gradually cut down the aft end of the keelson piece until, when I pushed down on the keelson to spring it into place, the length was just right.

I unfastened the molds from the strongback and set them aside.  The molds will help hold the hull in the right shape until all the inside structure is build.  I intended to also disassemble the strongback so I would have more room to work.  But I quickly discovered it makes a fine work table; I will leave the strongback up for now at least.

Tomorrown, weather permitting, I will epoxy and screw the keelson in place.  Before I do that, I will notch a couple of molds for the keelson and clamp them in place to hold the hull in the right shape.  I may even over-spring the keelson a bit, so that the lamination of the keelson, bottom and gripe together form a strong piece which will hold its curve and not try to straighten out.  The hull will be stronger if the keel assembly is rigid and not stressing the rest of the hull.


Monday, March 22, 2010

Ready to turn over

.

Monday, Mar. 22:  I gave the exterior of the hull a light sanding, and a sealer coat of penetrating epoxy.  When that has cured, tomorrow, the boat will be ready to be turned over so work on the inside can begin.  That's not to say the outside is finished.  There will be plenty of filling and fairing, a covering of fabric and epoxy, and work around the centerboard slot once that is cut.


The general schedule for the inside is: Brace the sides so the hull holds its shape. 2. The keelson.  3.  Cutting the centerboard slot.  4. The centerboard trunk.  5.  The thwarts. 6.The deck frames and deck.  Somewhere along the line, I need to make the rudder and spars.

Mrs.Strongback commented how pretty the hull looks with a sealer coat on it, and is sorry it can't stay that way. The sealert really brings out the colors in the Okume plywood.  But a boat like this with workboat genes shouldn't be finished bright, and even if I wanted to, by now I have accumulated plenty of dings and mistakes which a bright finish would made conspicuous but which will disappear with filler and paint.

Sunday, March 21, 2010

Inspection day, and another Chapelle 14' sharpie skiff discovered

.

Sunday, March 21:  A rainy no-boatbuilding day today, but two notable events to report.

This morning we received a surprise visit from a young yacht surveyor to inspect Tugga Bugga.  I was relieved that she approved what has been done on the boat to date.  In fact, the second picture below shows she was absolutely delighted with the progress.  I am confident that her approval was entirely objective and not influenced by the fact that Capt. Sharpie is her grandfather.


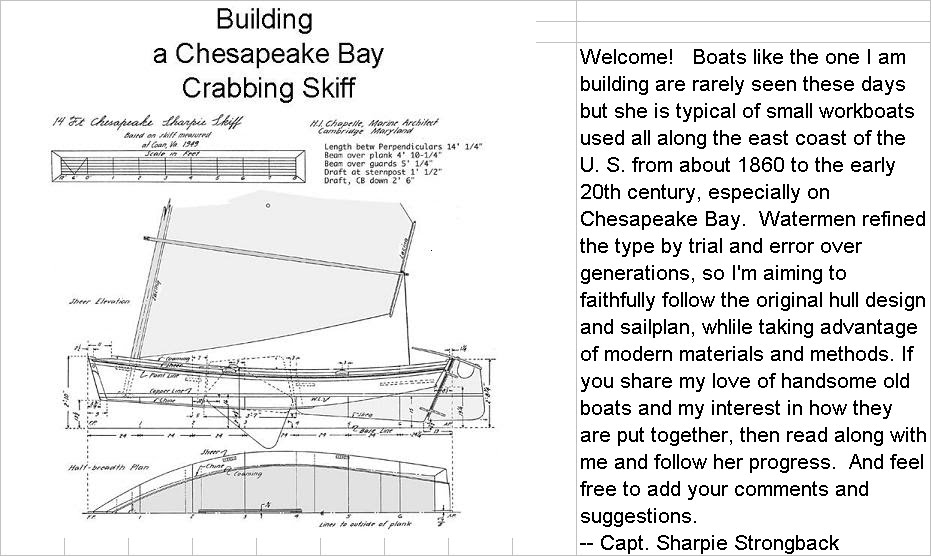
The other thing to report is that while aimlessly browsing online today I discovered that the Crystal River, Florida chapter of the Traditional Small Craft Assn. is building a boat to the same design, as a group project in cooperation with a local park. That's only a couple of hours away; we'll have to make a trek up to see her. Unlike me, they are building her entirely with hand tools and with traditional materials and methods.  It is interesting and enjoyable to see how differently the same boat can be built.  They are way ahead of me, and will doubless be sailing her before we return from the summer's travels.  Here's a link to their site: http://www.tsca.net/CRBB/sharpie.htm