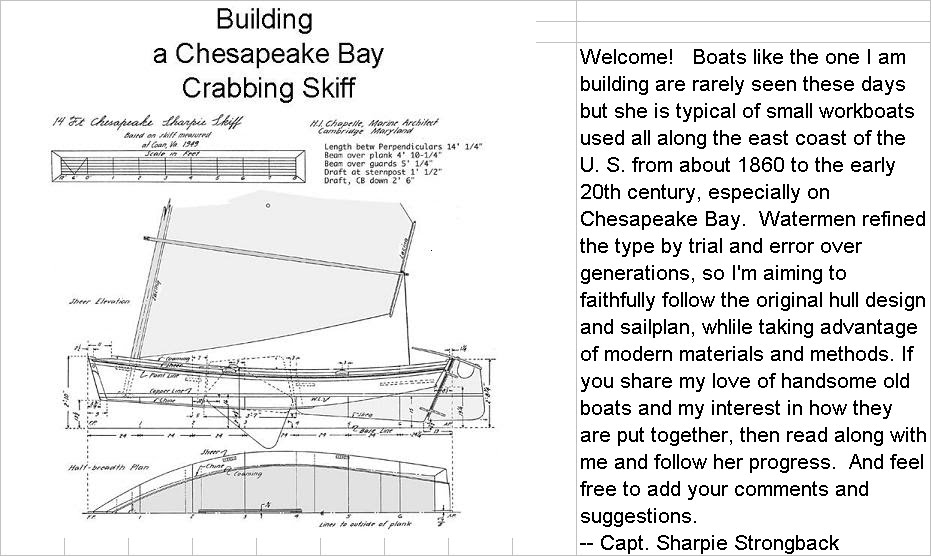
We will be travelling for the next three months, so completion of Tugga Bugga will have to wait until August. Since my last post I did accomplish a couple of things. Testing with fiberglass, I found that sheathing the centerboard will only add 1 mm to its thickness, and another milimeter if I sheath the inside of the centerboard trunk. I spent one day carefully drawing out the shape of the rudder and cutting out the two plywood outside layers.
But then it was time to prepare for a cruise aboard Carina, our venerable 25' sloop. Even after many years of living and boating in the Tampa Bay area, we had never taken the boat north of the Skyway Bridge into Tampa Bay proper. So our plan was for a week exploring the Bay up to its northern reaches.
Wed. Apr. 7: After provisioning, incl. 100 lbs of block ice, cast off at noon. Wind from the S at 10 kts, so we powered to south of the Bayway, but once we turned east we had a fair wind to sail through the Bayway E bridge and on under the Skyway. Then it was a dead downwind run across the Bay to Bahia Beach. We tried to follow an unmarked channel into the Little Manatee River, using Google Maps satellite view, but it became too shallow. So we followed a channel past many condos north of Bahia Beach all the way back to anchor in a seculed cove. A nice dinner aboard, and the Rays game on the radio. No complaints at all.
Forgot to bring: A mattress pad, plates, coffee cups, dinner knives, a shot glass, measuring cups, serving spoons, bug spray. Need a better cruising checklist.
Thur. Apr 8: Well, yes, we do have a complaint. Lots of mosquitos made for an uncomfortable night. The first night cruising or camping is always uncomfortable anyway. Calm at dawn, but the time we were back out on the Bay there was a good SE wind (10-15), and a fine sail 18 miles up to Tampa proper. Passing through the huge industrial and port area, we docked smack downtown at the Tampa Convention Center. We took a long walk including lunch, found a supermarket where we bought several items we'd forgotten, then back to the boat to relax and read. Later we treated ourselves to a good dinner ashore at a waterfront restaurant, watching the Univ. of Tampa crew and dragon boat clubs practicing. Then back to the boat to listen to a Rays game.
Of note: When we left the boat this afternoon, Mrs. Strongback volunteered her gym locker lock to secure the boat. When we returned, the lock fell apart, still locked. She was able to reach through the hatch ventilator hole to unlatch the hatch so I could climb inside and unscrew the companionway hasp from inside. Wait, it gets better. When we went out to dinner I locked up using a little luggage combination lock. When we got back to the boat it was dark and I couldn't read the combination until we were able to reflect a street light onto it.
Fri. 4-9. There were showers during the night. In the morning I found Starbucks and a newspaper ashore so we nursed those awating the forecast clearing. Finally cast off about 10 a.m. in a drizzle and calm, but not uncomfortable. About the time we exited the ship channel into the Bay a light wind came up from the NW, a front having shifted the wind 180 degrees just when we needed it. Sailed with an increasing breeze through a sizeable fleet of cruiser racers on their way to Tampa. We reached Apollo Beach, back on the E side of the Bay, at about 3, docked at a marina even though it's a popular anchorage- we want showers! Took a long walk and cooked dinner on the boat's grill. And listened to the Rays game. We beat the Yankees handily, making the short season record 3-1. Hoping the wind veers back to NE or else a beat to windward tomorrow.
Sat. 4-10. Wind did veer during the night. After a welcome shower and breakfast we were away at 10:20. A broad reach across the Bay, turning north between St. Petersburg and MacDill AFB took us up toward the Gandy Bridge, after a brief pause to yield the channel to a big tanker. Listened to an afternoon Rays game, a real drubbing by the Yankees, almost a no-hitter.
I had the impression that all three fixed bridges across Tampa Bay had 50-60' of vertical clearance, and had not checked. Turns out, they are all just over 40'. I don't know our mast height exactly, but thought it was 35'. Needless to say, passing under the Gandy Bridge was a tense moment. From the water, it looks like the mast will hit the bridge for sure. We tucked into a tiny cove right by the Howard Frankland bridge, about 500' under planes landing at Tampa International. Sounds unpleasant, but wasn't at all. Steaks on the grill, fireworks display for some reason in the direction of Raymond James Stadium, and a cool, comfortable night's sleep.
Sunday, 4-11. Up early on a sweatshirt-cool morning, to reach the other two bridges at low water. Howard Frankland charted at 45' but bulkhead marks showed 41' even at low water. Saturday evening I had recalculated the mast height, measuring the luff of the jib, the distance from the tack of the jib to the water and to the mast, eyeballing the distance from the head of the jib to the top of the antenna, and figure we're about 38' to 38 1/2'. Easy beam reach up the Bay, through both bridges, and a run down to Safety Harbor, the Bay's northern end, by 11 in the morning. The area is quite shallow. There's a little marine there, and I'd called twice to ask about a slip, with no call back. Took the channel into the marina anyway, in 5' of water, and did find an empty slip. A local sailor told us the slip had been empty for a while so an overnight stay was no problem. Lucky, because it turns out there's no provision for transient slips, and a 200-boat, 10-year waiting period for slip rentals. To make a noon Mass we hustled on foot 1 1/2 miles in our sailing clothes to the local church. The woman sitting behind us must have noticed our unusual appearance and asked if we had cycled there (cycling T-shirts, I guess). Learning we were at the marina, she offered us a ride back, which we gratefully accepted.
Safety Harbor is a pretty little town and we enjoyed our visit. A strange thing about the area is that because of the low bridges all the boats are about our size. We ate lunch ashore, relaxed aboard, and later walked to the top of Main Street for a nice dinner. The wind has shifted to N! Our luck is holding.
An odd thing: this afternoon a 6' alligator swam by our stern in the marina- in salt water yet. I later looked it up online and found that although alligators can live in fresh water only, very occasionally they are seen swimming briefly in salt water. Anyway, a first for us.
Mon. 4-12: Awoke hard aground with 2 hrs remaining to low tide. A leisurely breakfast and then checked depths with the dinghy- good water except in the slip. I set up spring lines under tension and we pulled off at 10:30. Wind had clocked around to NE, and to Courtney Campbell bridge was 4 miles to windward, our first beat of the trip. Then a close reach to Howard Frankland and Gandy bridges with wind piping up to 15-20 kts, with higher gusts. Reefed the main toward the end. Docked at Tampa Marina in the Rattlesnake Point area, took a walk up to Gandy Blvd. and back to boat for dinner, with wind continuing to increase. By evening it was howling and the boat was listing several degrees to starboard, but we were well protected and snug. Dinner and Rays on the radio, beating Orioles. Record now 4-3.
Tues. 4-13. a.m. wind gentler. Decided to skip downtown St. Pete- been there, and it’s only 6 miles. We’d have to stay in the marina because a strong E wind would make anchoring in Vinoy basin uncomfortable and difficult for a dinghy landing. So we had a long but easy broad reach down the Bay, 22 miles to home. Arrived at 4:50, by which time the wind was piping out of the E. After allowing for bridge opening waiting time, we averaged 3.3 knots for the day’s sail. Not so bad for a small boat. Obviously, a fair wind. Arriving home, we had three baseball-sized chunks of ice left.
We enjoyed ridiculously fair winds on the cruise, temperature mostly in the 70’s, no rain except one night. As perfect conditions as you get in this world. No mishaps, and a modest to-do list of improvements for the next cruise. Visited several interesting places which were new to us. A really fun trip. We look forward to the next one.
We hadn’t really cruised on the boat since the kids were kids. The boat is in better condition than ever, and a good size for the two of us. How we cruised with four children and a large dog I can’t imagine, but we did, and had great times doing it.
I’ll try to add a few pictures when I get a chance, but the next real post will be in August. Have a good spring and early summer.
Thursday, April 15, 2010


Friday, April 2, 2010
Finishing the sheer and starting the centerboard trunk
.
Friday, April 2: I finished trimming the sheer yesterday for the right level and angle. Seeing the finished hull shapre for the first time was a special pleasure. The boat has sweet lines, a function of the sheer, stern and stem rake, and the high tucked bottom at the stern. Why are most boats built now so completely lacking in asthetic appeal? Beats me.
Today I started on the centerboard trunk. I laid a sheet of plywood on the floor, used one edge as the plan's baseline (actually the baseline minus 9": no need to waste wood unnecessarily), followed the plan offsets to locate the level of the chine at the station sectons, which enabled me to find the level of the chine at the ends of the centerboard trunk slot cutout. I measured and drew where the top of the c.b. trunk should be, and followed the notes on the plans to draw the ends of the trunk. I used a long piece of molding to draw the curved bottom edge of the centerboard trunk where it is supposed to meet the top of the keelson. That gave me the profile of the c.b. trunk.
All this drawing is the same as traditional lofting, but by doing it on the pieces actual material saves a step and is one less chance to screw up. As it was, I had to redraw the aft end several times: thank goodness for gum erasers.
As a final check, I drilled a pilot hole in the centerboard where the pivot pin will be, and drove a small nail through the board and into the pivot pin point of the centerboard trunk drawing. Then I swun the centerboard around the pivot to make sure that it had clearance at both ends. It does, but as I suspected I will have to find a way to extend the board below the top level of the centerboard trunk to get it all the way down. Some kind of pivoting handle will be needed. The plans do not suggest anything.
I put the plywood panel on sawhorses and cut it in fourths. Then I screwed the piece I had drawn out to a second piece underneath. I screwed them together at the ends, where they will need to be screwed into the spacer piece (king post) later anyway. Then I cut out both both pieces together with a circular saw. Even sawing both 12mm pieces at once, the circular saw could cut along the gently curved bottom line. I left 1/16" for trim at the top and ends, and 3/4" at the bottom. I will scribe the bottom line so it fits against the keelson, whether its profile is the same as the plan or not. When I set the double side pieces into the boat, the bottom line matched... well, see for yourself:


Friday, April 2: I finished trimming the sheer yesterday for the right level and angle. Seeing the finished hull shapre for the first time was a special pleasure. The boat has sweet lines, a function of the sheer, stern and stem rake, and the high tucked bottom at the stern. Why are most boats built now so completely lacking in asthetic appeal? Beats me.
Today I started on the centerboard trunk. I laid a sheet of plywood on the floor, used one edge as the plan's baseline (actually the baseline minus 9": no need to waste wood unnecessarily), followed the plan offsets to locate the level of the chine at the station sectons, which enabled me to find the level of the chine at the ends of the centerboard trunk slot cutout. I measured and drew where the top of the c.b. trunk should be, and followed the notes on the plans to draw the ends of the trunk. I used a long piece of molding to draw the curved bottom edge of the centerboard trunk where it is supposed to meet the top of the keelson. That gave me the profile of the c.b. trunk.
All this drawing is the same as traditional lofting, but by doing it on the pieces actual material saves a step and is one less chance to screw up. As it was, I had to redraw the aft end several times: thank goodness for gum erasers.
As a final check, I drilled a pilot hole in the centerboard where the pivot pin will be, and drove a small nail through the board and into the pivot pin point of the centerboard trunk drawing. Then I swun the centerboard around the pivot to make sure that it had clearance at both ends. It does, but as I suspected I will have to find a way to extend the board below the top level of the centerboard trunk to get it all the way down. Some kind of pivoting handle will be needed. The plans do not suggest anything.
I put the plywood panel on sawhorses and cut it in fourths. Then I screwed the piece I had drawn out to a second piece underneath. I screwed them together at the ends, where they will need to be screwed into the spacer piece (king post) later anyway. Then I cut out both both pieces together with a circular saw. Even sawing both 12mm pieces at once, the circular saw could cut along the gently curved bottom line. I left 1/16" for trim at the top and ends, and 3/4" at the bottom. I will scribe the bottom line so it fits against the keelson, whether its profile is the same as the plan or not. When I set the double side pieces into the boat, the bottom line matched... well, see for yourself:

Not a bad fit, is it? In other words, the boat is shaped just like the plans say it should be.
Looking around online, it seems that about 1/8" is the right side clearance for the centerboard inside the trunk. Too little and the board might stick. Too much and the board can vibrate or flop around. But since the board and the inside of the trunk haven't been covered in fabric yet, I don't know how thick to make the end pieces. So before closing shop for the day I measured a sample piece of wood and then epoxied a little fiberglass to both sides. When that cures, I'll recheck the thickness and will see how much additional space is needed.

Wednesday, March 31, 2010
A little work done, and mystery ship identified
.
 Wednesday, Mar. 31: I had promised a friend to help him with a home remodeling project today, but he had to delay the starting time so I was able to get in an hour or two of boatbuilding. I worked with the electric plane to take the sheer down to the right level and the right angle for the deck. The plane is a hungry and unforgiving tool, and it is easy to cut away too much, so I took it extra slowly and carefully. I got the starboard side just about done before I was called away. We are having a stretch of perfect weather: sunny, dry, and in the 70's. It was a pleasure to be working outside.
 Wednesday, Mar. 31: I had promised a friend to help him with a home remodeling project today, but he had to delay the starting time so I was able to get in an hour or two of boatbuilding. I worked with the electric plane to take the sheer down to the right level and the right angle for the deck. The plane is a hungry and unforgiving tool, and it is easy to cut away too much, so I took it extra slowly and carefully. I got the starboard side just about done before I was called away. We are having a stretch of perfect weather: sunny, dry, and in the 70's. It was a pleasure to be working outside.
We have identified the sailing ship pictured yesterday, thanks to today's newspaper. It is a replica of Columbus's Pinta. There is a Columbus Foundation in the Virgin Islands which built a replica of the Nin~a, using trraditional methods and hand tools, and a somewhat less traditionally built replica of the Pinta. No Santa Maria yet. They are in town until next Monday, and docked nearby. We will try to find time to visit them before they leave.
Tuesday, March 30, 2010
Finishing the sheer clamps, And a strange visitor.
.
Tuesday, Mar. 30: Much of today was consumed with a trip to the Fiberglass Coatings store for a resupply of epoxy and all the fixings, so the only thing I got done was removing the sheer clamps and permanently refastening them with screws and epoxy. I did such a neat job of it they look just like they did yesterday, so no photo op.
But Mrs. Strongback did snap a picture worth showing. I was not home, but this was the second of two strange vessels which came by the house:

Tuesday, Mar. 30: Much of today was consumed with a trip to the Fiberglass Coatings store for a resupply of epoxy and all the fixings, so the only thing I got done was removing the sheer clamps and permanently refastening them with screws and epoxy. I did such a neat job of it they look just like they did yesterday, so no photo op.
But Mrs. Strongback did snap a picture worth showing. I was not home, but this was the second of two strange vessels which came by the house:

The other was smaller, and had four masts: lateen rigged on the two after masts and square on the forward two. I can't recall ever seeing a picture of a ship and rig like this. It looks somewhat like an arab dhow. Note that there are no footropes on the main yard. The large square sail must be furled with brailing lines from the deck. Or maybe the sail is never set at all. Maybe a movie prop?
Monday, March 29, 2010
Fitting the sheer clamps
.
Monday, Mar. 29:
Last Friday, after the epoxy fastening the keelson had cured, I continued work on the inside of the hull. For reference I marked on the bottom and sides all the design sections, which are spaced every two feet. I marked off where the centerboard trunk slot will be. The centerboard trunk and the thwarts are the main structural pieces remaining, but I want to get the sheer clamps fitted for two reasons. They will stiffen the hull sides and support it when I turn it over, which I expect I will be doing often. And they will provide something to brace temporary supports which will hold the hull to the proper width until the thwarts are put in. So I cut out two long pieces of clear fir, to serve as the sheer clamps. Using cutoff pieces, I fiddled with the bevel and rake of the ends until I had patterns for fits against the stem forward and the transom aft. I also recorded the compound miter angles which produced those patterns. And having learned how easy it is to get confused with miter cuts, I marked the pattern pieces which side is up, and which side of the saw blade to put the piece. Finally, I cut the bow ends to the right bevels.
Saturday was a no-boatbuilding day, as I helped my son lay out a playground area in his backyard. Sunday was rainy.
Today, two friends stopped by to "inspect" the boat, and I drafted them to help run the mast blank (a 20' 4x4 of douglas fir) through the thickness planer to smooth the four sides. Since I bought that piece last December it has been inside the house, and its weight has gone from 95 pounds to 75 pounds, just by drying out. The finished weight, after it is tapered and sanded, and dries some more, should only be about 30 pounds. Now when I get a chance I can mark the taper lines on all four smooth sides, and make the initial taper cuts with a skil saw.
After my helper friends left, I continued work on the sheer clamps. Sunday's rain had washed away my reference marks on the inside, which for some bad reason I had made with a red Sharpie pen. But the corresponding marks on the outside, which were in pencil, were still there. So I went around and remeasured and marked new lines on the inside where the sheer clamps should lie. Then I could proceed with fitting the sheer clamps. The way to fit a sheer clamp "by the book" which has to fit exactly between the stem and the transom, is to clamp the bow end in place and fasten or clamp it in place along its length as far as possible, letting the other end overhang the transom. When you can't go any farther, mark where the sheer clamp and side line up, and measure how far it is along the side from the mark to the transom, and then remove the piece and cut it to that length. I didn't have the courage to do that, fearing that somehow it would cut it too short. Instead, I gradually trimmed the transom end until it fit.
 That necessitated several trial fittings, but peace of mind is worth a little extra work. When the piece fit and was clamped in place, I screwed it to the side. Its mate on the port side went much quicker. At that point I had both sheer clamps dry fitted. I will still have to remove them and reattach them with epoxy. But in the meantime they add a surprising amount of rigidity to the hull.
The last thing I did today was make a couple of temporary braces to hold the sides out to the correct width at station 2 (4' aft of the stem) and station 4 (8' aft of the stem). The desire of all the longitudinals (chine logs, sheer clamps, gripe and keelson) to straighten out have the effect of drawing the ends down and the sides in. So the temporary braces are needed to push the sides out by about two inches to restore the hull to its proper shape. I had planned to also put a brace at station 6, but with the other two braces in, the beam there was already just what it should be.

Now I have a rigid hull which will hold its shape until I build the structural pieces inside: the thwarts and the frames and deck. A nomenclature note about the "deck": it will be only 6" wide. The plans call it a "covering board", and "washboard" is also a common word for a narrow deck. But thinking ahead, other people sailing with me might not recognize those words; everyone knows what a deck is, so "deck" it will be.
Next up: the centerboard trunk.
Monday, Mar. 29:
Last Friday, after the epoxy fastening the keelson had cured, I continued work on the inside of the hull. For reference I marked on the bottom and sides all the design sections, which are spaced every two feet. I marked off where the centerboard trunk slot will be. The centerboard trunk and the thwarts are the main structural pieces remaining, but I want to get the sheer clamps fitted for two reasons. They will stiffen the hull sides and support it when I turn it over, which I expect I will be doing often. And they will provide something to brace temporary supports which will hold the hull to the proper width until the thwarts are put in. So I cut out two long pieces of clear fir, to serve as the sheer clamps. Using cutoff pieces, I fiddled with the bevel and rake of the ends until I had patterns for fits against the stem forward and the transom aft. I also recorded the compound miter angles which produced those patterns. And having learned how easy it is to get confused with miter cuts, I marked the pattern pieces which side is up, and which side of the saw blade to put the piece. Finally, I cut the bow ends to the right bevels.
Saturday was a no-boatbuilding day, as I helped my son lay out a playground area in his backyard. Sunday was rainy.
Today, two friends stopped by to "inspect" the boat, and I drafted them to help run the mast blank (a 20' 4x4 of douglas fir) through the thickness planer to smooth the four sides. Since I bought that piece last December it has been inside the house, and its weight has gone from 95 pounds to 75 pounds, just by drying out. The finished weight, after it is tapered and sanded, and dries some more, should only be about 30 pounds. Now when I get a chance I can mark the taper lines on all four smooth sides, and make the initial taper cuts with a skil saw.
After my helper friends left, I continued work on the sheer clamps. Sunday's rain had washed away my reference marks on the inside, which for some bad reason I had made with a red Sharpie pen. But the corresponding marks on the outside, which were in pencil, were still there. So I went around and remeasured and marked new lines on the inside where the sheer clamps should lie. Then I could proceed with fitting the sheer clamps. The way to fit a sheer clamp "by the book" which has to fit exactly between the stem and the transom, is to clamp the bow end in place and fasten or clamp it in place along its length as far as possible, letting the other end overhang the transom. When you can't go any farther, mark where the sheer clamp and side line up, and measure how far it is along the side from the mark to the transom, and then remove the piece and cut it to that length. I didn't have the courage to do that, fearing that somehow it would cut it too short. Instead, I gradually trimmed the transom end until it fit.

The last thing I did today was make a couple of temporary braces to hold the sides out to the correct width at station 2 (4' aft of the stem) and station 4 (8' aft of the stem). The desire of all the longitudinals (chine logs, sheer clamps, gripe and keelson) to straighten out have the effect of drawing the ends down and the sides in. So the temporary braces are needed to push the sides out by about two inches to restore the hull to its proper shape. I had planned to also put a brace at station 6, but with the other two braces in, the beam there was already just what it should be.

Now I have a rigid hull which will hold its shape until I build the structural pieces inside: the thwarts and the frames and deck. A nomenclature note about the "deck": it will be only 6" wide. The plans call it a "covering board", and "washboard" is also a common word for a narrow deck. But thinking ahead, other people sailing with me might not recognize those words; everyone knows what a deck is, so "deck" it will be.
Next up: the centerboard trunk.
Thursday, March 25, 2010
Finishing fitting the keelson
.
Thursday, March 25: Today's job was to screw and epoxy the keelson in place, but there were several preliminaries which had to be done first. I built a low sawhorse to support the boat in place. Under the stem I set up jack stands with a plank between them. And I blocked up the skeg to the right height. I measured and marked carefully where the centerboard slot in the keelson will be, to know where not to put screws. I notched the #4 mold for the keelson so I could clamp it in place to hold the hull shape while fastening the keelson. And I taped off the area on the inside bottom where the keelson is to lie, to keep the epoxy from making a mess. Finally I wet out the keelson and bottom with unthickened epoxy, mixed up a thick paste of epoxy and spread it on the bottom, and laid the keelson in place. I screwed it down, working from the bow aft, and when I reached midships I was able to clamp the mold in place. The keelson is now laminated to the bottom panels and to the gripe and skeg. The centerboard trunk will be the last piece of the backbone. That's it: a day's work, at my pace. One reason each step takes so long is my reliance on epoxy adhesive; it takes a while to mix and apply, and once a piece is fastened with screws and epoxy, I need to leave it alone to cure. Makes for slow progress, but it's worth it to get a strong and long-lived boat.

Thursday, March 25: Today's job was to screw and epoxy the keelson in place, but there were several preliminaries which had to be done first. I built a low sawhorse to support the boat in place. Under the stem I set up jack stands with a plank between them. And I blocked up the skeg to the right height. I measured and marked carefully where the centerboard slot in the keelson will be, to know where not to put screws. I notched the #4 mold for the keelson so I could clamp it in place to hold the hull shape while fastening the keelson. And I taped off the area on the inside bottom where the keelson is to lie, to keep the epoxy from making a mess. Finally I wet out the keelson and bottom with unthickened epoxy, mixed up a thick paste of epoxy and spread it on the bottom, and laid the keelson in place. I screwed it down, working from the bow aft, and when I reached midships I was able to clamp the mold in place. The keelson is now laminated to the bottom panels and to the gripe and skeg. The centerboard trunk will be the last piece of the backbone. That's it: a day's work, at my pace. One reason each step takes so long is my reliance on epoxy adhesive; it takes a while to mix and apply, and once a piece is fastened with screws and epoxy, I need to leave it alone to cure. Makes for slow progress, but it's worth it to get a strong and long-lived boat.

Wednesday, March 24, 2010
Starting on the inside- fitting the keelson
.
Wednesday, March 24: Yesterday I pulled the hull off the molds with the help of two friends and turned her over. Turns out, the shell of the hull is still very light, so it was no job at all. It was a particular pleasure to see the boat right side up for the first time. I had other obligations, so I got nothing further done that day.
Today I started work on the inside. The first order of business is to make and fit the keelson. I gave the inside a light sanding and carefully marked the centerline. The bottom is in three pieces, joined by butt straps inside, so I needed to cut away the butt straps where the keelson lies. Either that or notch the keelson, which would have weakened it. Cutting the butt straps was awkward, and I made a messy job of it. Epoxy will hide the poor work. Then I pulled out my last remaining whole 2x6x16 clear fir board from its home inside the house, and fashioned it into the keelson. I traced on paper the shape the forward end makes, a chopped-off V, and transferred that to a cutoff piece of 1x6 to make a pattern, adding the flare out and forward to meet the chine logs and the stem. The pattern fit into the boat, so I knew I had the shape right, and duplicated it on the forward end of the keelson piece. Then I measured the angle the bottom makes with the transom and set the miter saw to that angle. I gradually cut down the aft end of the keelson piece until, when I pushed down on the keelson to spring it into place, the length was just right.
I unfastened the molds from the strongback and set them aside. The molds will help hold the hull in the right shape until all the inside structure is build. I intended to also disassemble the strongback so I would have more room to work. But I quickly discovered it makes a fine work table; I will leave the strongback up for now at least.
Tomorrown, weather permitting, I will epoxy and screw the keelson in place. Before I do that, I will notch a couple of molds for the keelson and clamp them in place to hold the hull in the right shape. I may even over-spring the keelson a bit, so that the lamination of the keelson, bottom and gripe together form a strong piece which will hold its curve and not try to straighten out. The hull will be stronger if the keel assembly is rigid and not stressing the rest of the hull.

Wednesday, March 24: Yesterday I pulled the hull off the molds with the help of two friends and turned her over. Turns out, the shell of the hull is still very light, so it was no job at all. It was a particular pleasure to see the boat right side up for the first time. I had other obligations, so I got nothing further done that day.
Today I started work on the inside. The first order of business is to make and fit the keelson. I gave the inside a light sanding and carefully marked the centerline. The bottom is in three pieces, joined by butt straps inside, so I needed to cut away the butt straps where the keelson lies. Either that or notch the keelson, which would have weakened it. Cutting the butt straps was awkward, and I made a messy job of it. Epoxy will hide the poor work. Then I pulled out my last remaining whole 2x6x16 clear fir board from its home inside the house, and fashioned it into the keelson. I traced on paper the shape the forward end makes, a chopped-off V, and transferred that to a cutoff piece of 1x6 to make a pattern, adding the flare out and forward to meet the chine logs and the stem. The pattern fit into the boat, so I knew I had the shape right, and duplicated it on the forward end of the keelson piece. Then I measured the angle the bottom makes with the transom and set the miter saw to that angle. I gradually cut down the aft end of the keelson piece until, when I pushed down on the keelson to spring it into place, the length was just right.
I unfastened the molds from the strongback and set them aside. The molds will help hold the hull in the right shape until all the inside structure is build. I intended to also disassemble the strongback so I would have more room to work. But I quickly discovered it makes a fine work table; I will leave the strongback up for now at least.
Tomorrown, weather permitting, I will epoxy and screw the keelson in place. Before I do that, I will notch a couple of molds for the keelson and clamp them in place to hold the hull in the right shape. I may even over-spring the keelson a bit, so that the lamination of the keelson, bottom and gripe together form a strong piece which will hold its curve and not try to straighten out. The hull will be stronger if the keel assembly is rigid and not stressing the rest of the hull.

Subscribe to:
Posts (Atom)

