Wednesday, February 16, 2011

Done

To the extent any boat is ever finished, Tugga Bugga is done. Sure, there is touch-up, improvement, and accessorizing to do: but that will transition into maintenance.

We'll have a modest christening party March 5th. Between now and then I may enlist help to get her over the seawall and do a bit of "tank testing". I'll continue to add notes here as I trim her up and fiddle with improvements as the need appears. And I'll post a gallery of photos both ashore and afloat. For now, a sunset picture:


Monday, February 14, 2011

Rigged

The wind today was light out of the west, which is what I was waiting for to check out the rigging. I laced the sail to the mast, rigged the sprit and club, and hoisted the sail.

I have followed Chapelle's plan for the rig as exactly as possible, and read and thought a lot about the sail and rigging. But when I set it up in real life there were many surprises. I found that it is necessary to have the clew laced and tied to the club before doing anything else. The sprit and mainsheet block need to be secured to the club before hoisting the sail, but to do that the forward end of the sprit needs to initially hang way over the bow. Lacing the luff to the mast is straightforward. Once the sail is hoisted the downhaul and lacing line are secured, the sprit is tightened and its control line, the snotter, is cleated down. That will take a lot of work right up forward; I hope the boat is steadier than some dinghies I've sailed, so setting sail is not an athletic feat. Whatever- I'll find out soon enough.

I had fixed the mast step in place temporarily because a small error would cause the mast to rake to much or too little. It turns out I had it just right. I was asked to show a photo alongside Chapelle's sailplan:


After unrigging, I had time to give the inside trim and the coaming a finish coat of paint. The rub rails remain to be finished. I'll fill the screw holes and give them a couple of coats of paint. After that she'll be ready to sail. Not row though; oarlocks need to be made and attached for two rowing stations. When the boat is in the water I'll be better able to decide how high the oarlocks need to be for the oars to clear the coaming inboard.

Wednesday, February 9, 2011

Rub Rail on, and More Painting

Although the day started in the 40's, it soon warmed up enough to paint.

I screwed the rub rails on, working from bow to stern, using a pair of clamps to bend the rails to take the strain off the screws.


After I started to screw on the first rail, the forward end just didn't look right- it stuck out to the side too much. I had not shaped the end with enough taper. So I unscrewed it, recut the end, and cut the other rail to match. Once the rails were fully attached, I trimmed off the excess at the transom. A straightforward job, but one with plenty of opportunity to botch it, so I did it carefully. The screw holes need filling, and the rails will get two more coats of paint.

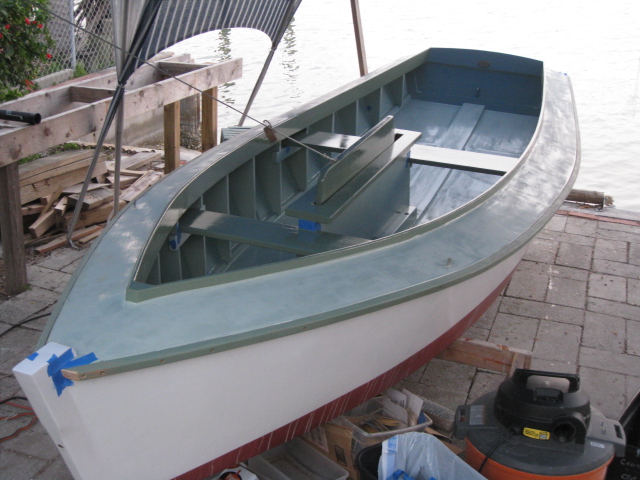
The deck will need a bit of filling and a second coat of paint, and the bottom inside can use a second coat, so I prepped them with sanding, vacuuming and wiping down with a damp rag. But the actual painting today was the darker green trim on the centerboard and its case, the thwarts, including the stern sheets planks which have not yet been installed, and the coaming.

Getting the rub rail on and the coaming painted starts to show the boat's finished appearance, even with the deck sanded. I like the contrast between the two shades of green.

Tuesday, February 8, 2011

A Day of Boatbuilding Weather at Last

After three days of fog, mist and rain, today was chilly and windy, but dry enough for painting. Tomorrow may be too cold for it.

I got a coat of light green paint on the starboard side of the interior and deck, and a coat of white on the topsides all around. She is starting to look more like a boat than a project.


Still to do: Numerous pinholes in the the deck need filling, followed by sanding and another coat of paint. The bottom inside could use another coat, too. The rub rails can go on now. They and the trim inside take a darker shade of green paint. The bottom paint along the lower edge of the topsides needs another coat of paint, just to cover up the streaks of green left by last week's paint failure.

Friday, February 4, 2011

Back to Painting

Today turned out to be warm and dry- good painting weather. But before I could paint anything I had to sand the whole boat, inside and outside down to the chines, to get a good surface for the new oil-based enamel. That took only a couple of hours with the orbital and detail sanders, and a little hand sanding.

After vacuuming everything and wiping down with damp cloths, the boat was clean of dust and ready to paint. I started on the inside and got the entire port side done. It was slow going, and I could see that there would not be time to paint the starboard side, so I gave the deck its first coat (for the second time).

The new paint is a gloss finish, which mercilessly shows any imperfection in the surface, but I'm willing to make that sacrifice if it doesn't just turn to slime and slide off like the acrylic paint did. It makes a good looking finish, but brush marks do show. It will need sanding and a second coat, at least on the inside bottom and the deck.

No pictures today; it looks just like it did Wednesday, except this time the paint should still be there tomorrow.

Tomorrow's forecast is for rain, so I may not get much done. But who knows- today was also supposed to be cloudy and wet.

Thursday, February 3, 2011

Two Steps Back

Yesterday's post mentioned concerns about the acrylic paint I've been using but put off doing anything until man~ana. Last night was warm and humid; when I got up this morning there was a thick fog, but not so thick that I couldn't see that all the paint I put on yesterday had absorbed so much moisture that it turned to a thin liquid, pooling in the bilge and running off the deck down the topsides. I have never seen any paint fail so completely. God's own mess.


I realized that today is man~ana.

I cranked up the pressure washer and washed off all the slimy residue of what should have been yesterday's paint, bailed out the boat, and repeated the process until the water was nearly clear. Then I set out to get better paint that matched the colors we had so carefully chosen. The paint store washed their hands of the problem (pun intended). They can match colors but have no better paint. So off I went to West Marine. They have good marine paint, but only in stock colors. If they had better color choices I would have bought there originally, environment be damned. Back home, I got on the phone and after a couple of calls reached a Sherwin Williams store which carries industrial/marine enamel and can match colors. So I made color samples and headed there. The people at the store were very helpful, and matched the colors perfectly. They offered me the choice of a latex base or oil base, but that was an easy choice. My previous attempt to go green with a water-based paint was a failed experiment. I'll wait for the technology to catch up before I try that again.

The forecast for the next few days is for more fog and possible rain, so I may not be able to paint for a while, except for the stern sheets boards, which are indoors.

I have ordered two self-bailing drains which I will install on either side of the centerboard trunk. They will help keep the boat dry, both in and out of the water. Besides painting, I don't have much else further to do except two more coats of varnish on the tiller and hiking stick.

Wednesday, February 2, 2011

A Day of Painting

Today started with sanding yesterday's epoxy coating on the coaming. All the shaping and grinding had already been done, so it was a quick and easy job.

I vacuumed the inside, then vacuumed it again. The spaces between the thwarts and deck are nearly inaccessible to everything except dust, but I was able to reach in and wipe them down too.

Most of the day's work consisted of repainting the entire inside except the thwarts and other trim, which are a darker shade of the same green color. As I worked, additional dust and debris appeared as if by magic, so the shop vac was kept busy.

The acrylic paint I'm using may be a problem. It dries quickly and cures hard over a period of weeks, but it does not seem to stand up to scrubbing very well. In use, it may not resist abrasion satisfactorily. I need more topside white paint anyway, so I'll talk with the paint people about my alternatives. Acrylic paint is sometimes used as an undercoat, with oil- or MEK-based paint over it, but whether I can get the same shade of color is another matter. I'll deal with it, but I'm not going to worry about it now.

Finally today, the deck got its first coat of paint. Painting reveals previously undetected faults in the surface, but in this case the only faults are small pinholes which can be filled easily before the next coat of paint. I did not paint the coaming today because it will be the darker trim color. Maybe tomorrow.

Tuesday, February 1, 2011

Back at it

I returned home last evening and got back to boatbuilding today.

Closing in on the final step of endless painting, sanding and repainting, I sanded the coaming and deck and gave the coaming one last coat of epoxy. Using the same batch of epoxy, I mixed up some fairing putty and filled the screw holes left from installing the lifting sling straps and the u-bolt in the transom for the lifting sling aft. I also gave both parts of the tiller their fourth coat of varnish.