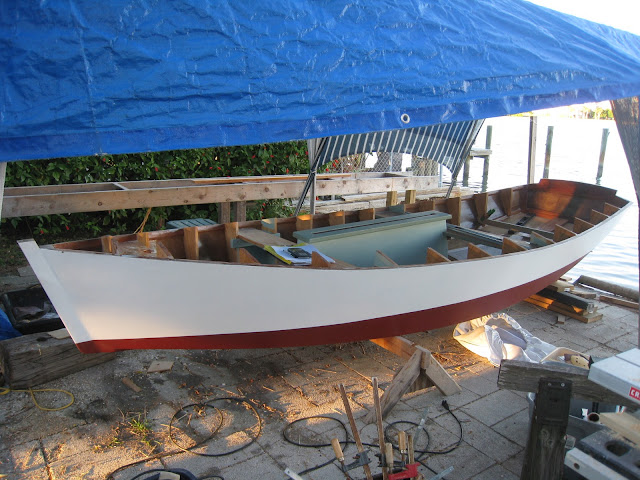
Wednesday, December 29, 2010

Deck on Permanently

I thought I would glue and screw the deck in place on Christmas Eve, but the holiday and especially the weather kept me from it until today.

Waiting for a warm day I hung the rudder and made a pattern for the piece the tiller will fit into. I still need to sand the rudder smooth and probably give it another coat of epoxy before painting it.

I also made "oyster whackers", protective strips of brass screwed to the forefoot (the bottom of the stem), the bottom corner of the centerboard, and the entire skeg. The boat's draft will be about 13" with the board up, and the trailing end of the skeg will be the low point, the first thing to hit bottom. The rudder will not go aground; its lower edge will be an inch or two above the skeg's.  Although many boats are designed with a rudder which touches bottom before the keel; none should be. Running aground means loss of control, at best; at worst, loss of the rudder.


Today was forecast to get above 60 degrees. I don't think it made it, but I went ahead with the deck installation anyway. Over the last few days while I was killing time, I pre-drilled all the screws holes and put in all the screws a couple of turns, so that when I put the deck down, epoxy would not squeeze up through the screw holes. I also masked off the topsides and the inside to protect against drips and runs. So today I simply wet out the sheer and frames, wet out the underside of the deck where it will contact those parts, and spread epoxy adhesive on the sheer and frames. Then I just laid the deck pieces on top and screwed them down. It went smoothly and didn't take too long. It turned out that drips and runs were not a problem, but it was still hard to remove the masking tape from under the deck. I don't promise there aren't any small scraps of blue tape remaining but I do promise that no one will see them.

I had a little time left, so I mixed up some microbaloon filler and filled all the screw holes on the deck. If it were warm, that would save me a whole day, but I doubt the filler will harden until late tomorrow, if then.


The next job on the hull will be to fill the joint between the deck and coaming, then fabric-coat the deck and coaming. After that, the rub rail. And a lot of sanding, filling, and painting.

Thursday, December 23, 2010

Time

I read somewhere that a sharpie could be built in a weekend. Hah! Since I started in 2009 and obviously won’t launch until 2011, I thought about how many hours it has taken me to build the boat to this point. Twelve months, minus three when I was out of town. Four weeks in October and November out of town. So say eight months. I work every day for four or five hours, but probably miss one day a week entirely for one reason or another. Add it up: I’m at about 930 hours. That's not counting time spent writing this blog, which is icing on the cake; I enjoy it as much as the boatbuilding, and it gives me a chance to think through what I’ve done and what comes next. Anyway, that’s more than a weekend. I can’t think of a better way to spend time, and I value my time highly, but obviously it isn’t worth much these days in money terms. With that in mind, consider Howard Chapelle’s ideas about the cost of a boatbuilder’s time when he makes a mistake:


It has been often said that the mistakes of the amateur builder are less costly than those of the professional. There is some truth in this- but not much. The amateur’s mistakes may destroy costly material but, more often, [lead] him to try to “patch” rather than start back and correct. …with the result that the completed boat is either a fizzle or a jerry-built abortion.

Reading that, I remembered when I was fitting the side planks to the stem and found that the stem had been cut at too great an angle, forcing the side planks to take an unnatural turn in- after I had already glued and screwed them on. I very nearly pressed ahead with a “patch” which might very well have resulted in a “fizzle”. I backed up and rebuilt the sides and stem. An obvious right decision, but it wasn’t obvious at the time.

Deck Ready to Go On for Good

Yesterday I prepared the rudder for fabric coating of the second side, which I gave a saturation coat of epoxy first thing today and left it to harden.

While the rudder was cooking I sanded the coaming, smoothing over all the filled screw holes and particularly the repaired area where it was broken. Then I gave the coaming and the boat's inside a good vacuuming, since once the deck is on there are many spots I will never see again. That done, I laid the deck side pieces in place for a final fitting. I sanded their edges a bit to give a better fit against the coaming. When all looked right, I screwed the side pieces in place. I marked where the frames lie, since I'll need to apply epoxy to the underside of the deck in those places when I finally glue it down. The remaining job in preparing the deck to be glued and screwed was to fit the bow deck piece. Although it is a small piece, it was a devil's job to make because it takes a sharp bend across the boat. After breaking two previous pieces, I made one with closely spaced fore-and-aft grooves sawn into it. I clamped the piece into four clamps I had made with curves to match the required bend. Then I epoxied strips of fiberglass tape across the underside of the piece between the clamps, and left it alone for the last week. Today, when I unclamped it, it held the bent shape without further encouragement. I trimmed it up to fit around the coaming and to match up with the side pieces, working carefully because I sure didn't want to make a new piece. In the picture below it is lying in place with the right shape with nothing holding it down. If it is warm enough for epoxy tomorrow I will glue and screw the deck in place permanently. The next step there will be to fabric-cover the deck and coaming together.


Going back to the rudder, I found it was semi-hardened to the right degree that I could trim off the excess fabric and apply a second coat of epoxy.

When I glued and screwed the coaming in place yesterday, a happy coincidence was that where the coaming meets the transom, its bottom edge matches up precisely with the width of the top piece of the transom assembly, which shows in the picture above. Back when I made the transom I gave that no thought at all. The width of the piece was dictated by the size of the board it was cut from. Blind luck, but it looks good.

Wednesday, December 22, 2010

Progress on Three Fronts

I had limited time for boatbuilding the last couple of days. But on the coaming, I did sand excess epoxy from having laminated and sealed the composite pieces, but the most important step was repairing the broken starboard side coaming. I mated the broken pieces with epoxy as an adhesive, wrapped the joint with fiberglass cloth, wrapped the whole business with heavy plastic, and clamped it between two planks for support while the epoxy cured. When I took the assembly apart the repair was solid. It isn't too sloppy, but 'll wait until the coaming is installed before sanding and finishing the repair area.

Today I glued and screwed the coaming permanently in place, cleaned up excess adhesive around the joints, then filled the many screw and nail holes which peppered the coaming pieces from their construction and installation. I had already sealed the end grain of the plywood lamination at the top and bottom edges, but I added another coat of sealer epoxy to the top edge after the coaming was installed. The next step is to sand the coaming ready for finishing. Then I'll be ready to attach the deck.


I took my time to get the coaming installation right, but I had a little time left on the day, so I worked on the rudder. One side and all the edges were previously covered with polyester fabric. I sanded those parts smooth and prepared the other side to be covered with fabric set in epoxy. I stretched the fabric over the uncovered side and secured it in place with package sealing tape on the opposite side. I stopped short of applying epoxy today. Tomorrow or whenever, I'll apply epoxy to the cloth, wait until it is halfway hardened, then cut away the excess at the edges and apply a second coat of epoxy. That's what I did on the first side, and it worked out well. After the second side cures, I can add a finish layer of epoxy if needed, install the hardware, hang the rudder, and strike a waterline for painting. Then I'll make the aft portion of the tiller to fit over the two tabs at the top of the rudder and attach that to the forward part of the tiller which I already have. Note the dizzying pattern the weave of the fabric makes in the picture. 


Finally today, I took the first step in rigging the boat. The masthead is very slender, as the plans call for, but I do not want to compromise its strength by cutting a slot for a halyard sheave or drilling holes to screw or bolt on hardware. Instead, I made a loop of 3/16" nylon line (planning the length carefully), short-spliced the ends together, then wrapped it into a double loop on the mast and tightly seized one part of it into a smaller loop to accommodate the halyard block shackle. If I made it tight enough, and I think I did, it will hold firmly in place when the halyard is brought up tight. The shackle as shown needs to be turned around. The picture was taken after dark and you can see dew already forming on the mast.


Sunday, December 19, 2010

Painting the Inside

Today was chilly and damp, but good painting weather for my acrylic paint, which on a fair day dries as fast as I can apply it.  Portions of the bow area are so hard to reach I had to use a mirror to see what I was doing. I'm now qualified to do dentistry or laproscopic surgery.


I got a full coat of paint on the entire inside, including the darker contrasting color on the thwarts.


Next up: glue and screw the coaming and deck. I have decided to wait until that is done before painting additional coats. It will be harder to reach under the deck to paint the sides, but even now the hard places to paint will be out of sight on the finished boat. Attaching the coaming and deck will inevitably leave epoxy drips, and I'll want to clean them up before the final coats of paint.

Saturday, December 18, 2010

Prepped for Painting

Like most days, this one did not go as planned.

Yesterday's epoxy/fabric sheathing on one side of the rudder is not ready for sanding. High humidity during the night followed by rain this morning left it with a coating of slippery blush. I'll have to leave it to cure for three or four days and then scrub off the blush before moving forward on the rudder project.

After the rain stopped I sponged out the small amount of water which had dripped into the boat, and after that dried I started sanding all the second-round filled holes in the boat's interior. In the process I found two unfilled screw holes which I had overlooked twice despite carefully sticking my nose in every odd corner.I decided to tape over those spots and deal with them later. I vacuumed all the dust and debris out, then did it again for good measure. Then I wiped the entire interior down with a damp sponge. More rain was forecast, so I couldn't paint today, but at least the boat is clean and ready for painting when I get the weather for it.

Since I couldn't paint, I filled those last two screw holes and used my remaining time to hang the centerboard.  I set up a mirror so I could see daylight through the pivot pin hole when the board was in the right place. When I finally got the board aligned right, I slipped in the 1/2" pin, and tapped protective plastic sleeves onto the ends of the pin where it would otherwise rub on the centerboard trunk. I taped the outline of the aluminum plates I'd made to cover the ends of the pin, laid two beads of silicone around the pin hole, and screwed a plate onto each side. The centerboard pivot is above the waterline, so I'm not very worried about a leak there, but this sould provide a durable and watertight support for the pivot pin anyway.


The centerboard is in place, ready to go sailing. Plenty of other things aren't ready, of course.


Friday, December 17, 2010

A Good Day for Boatbuilding, and Gems of Wisdom

Today was the first time all week the temperature was above the "E-line", the 60 degrees necessary for epoxy to set up, and I made the most of it.

I filled what I hope are the last of the holes, gaps, etc. on the boat's interior, and tomorrow I will sand them and paint if weather permits.

The centerboard is now done- ready to hang on its pivot pin. Working indoors I sanded and painted the board over the last few days. The part below the waterline is anti-fouling bottom paint. The upper part is green to match the interior trim. Today I brought it outside and applied the finish coat of green paint, and attached a lanyard to pull it down and back up. I'll hold off on hanging the centerboard for a few days while the paint cures.


I also gave all the sternsheets boards a second coat of paint today. They are ready to put in the boat as soon as the interior is painted.

One side of the rudder got its fabric sheathing, set in epoxy. Having learned a thing or two frm fabric-coating the centerboard, I was able to do a much neater job on the rudder. Tomorrow I can flip it and do the other side, weather again permitting.


Finally, I epoxied fiberglass tape in strips across the underside of the forward deck piece to strengthen and stiffen it.


As for gems of wisdom, this from Howard Chapelle:

"Recently... glowing compliments were given to the presumed skill of the amateur builder. It is my considered opinion that this is slush and that the average home builder is a dub where good boatbuilding is concerned".

and this:

"I think both amateur and professional builders are too often encouraged by designers to attempt boats beyond their skills.  ... I have long believed that the sharpie, with her sides and bottom straight in section... is the utmost the outright beginner should attempt as a home-building project".

Sunday, December 12, 2010

Weather Bound, and Learning about Sharpie History

It may be Florida, but weather has put boatbuilding in low gear, if not neutral. Nevertheless, since my past post I have gotten a few things done.

Working indoors, I put the last coat of epoxy on the centerboard. In another day or two I can wash off the epoxy blush and paint it. I'll put antifouling bottom paint on the bottom 6" and the dark shade of interior green on the rest. Also indoors, I filled and sanded all the screw holes in the rudder. It is ready for fabric coating.

Friday was the only recent day warm enough for epoxy outside. I went around the boat and marked every screw hole, nail hole, ding and crack, and followed up with microballoon filler. Yesterday, Saturday, I sanded all those spots. Quality control inspection found about a dozen spots which need redoing, and an equal number which were missed. We are in an unusual cold snap for this time of year, and it may be late next week before we see 60 degrees again. I can do some detail work indoors, but painting the inside of the hull will have to wait.

The main thing I have been doing is reading about sharpie designs and construction techniques.

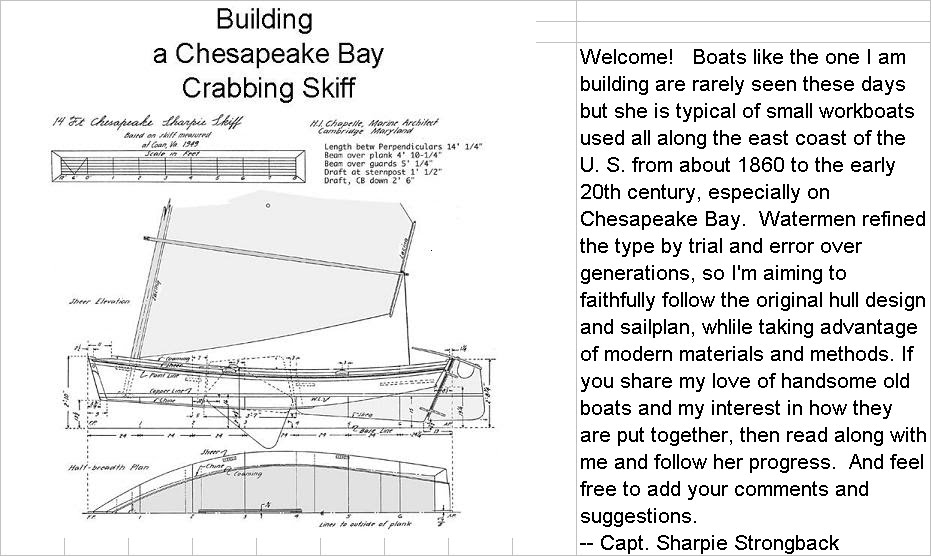
Through the generosity of Capt. James Watson, the technical guru at Gougeon Brothers, I obtained copies of a series of articles Howard I. Chapelle wrote in 1956 titled The American Sharpie Yacht. Chapelle promotes the sharpie as the ideal type for amateur boatbuilders who want the cheapest, easiest-to-build, proven type of boat practical for family sailing and cruising. He makes the case convincingly, and illustrates it with many of his own designs, adapted from old boats and traditional types. I thought the sharpie skiff I'm building was included in the articles. It isn't, but the articles make for great reading: Chapelle was both knowledgeable and opinionated. Some of his ideas are contrary to conventional wisdom, both then and especially now. I'll quote some of his remarks as space permits.

If there is one iconic sharpie in history, it was the 29' double-ender Egret, built in New York to the design of Commodore Ralph Munroe in Coconut Grove, Florida in 1886, and used by him for many years along the coast between Miami and Palm Beach in they years before there was any road or railroad connecting them. Chapelle knew Munroe well, and made several designs based on Egret's surviving half model. Three of those versions are illustrated in the American Sharpie Yacht articles. Capt. James Watson built a beautiful Egret type from one of those plans last year, and the boat is described in the Spring, 2010 issue of the online publication Epoxyworks. Munroe was influential in spreading the popularity of sharpies throughout Florida, especially in the Keys and the Gulf coast.

In the summers of my college years I taught sailing at Coconut Grove. Each day I would lead a fleet of fledgling Optimist Pram sailers through the anchorage to the open water offshore from the Barnacle, Commodore Munroe's family home. It's now a state park, but the Commodore's son Wirth Munroe, a prolific and successful boat designer himself, lived there then. I met Wirth Munroe several times, but didn't know anything of the family's history until years later. There was a big old-fashioned catboat moored at the house, but no sharpies. Still, my new boat can claim a connection, through only a couple degrees of separation, to boats of its type in Florida waters going back over a hundred years.

Despite Chapelle's evangelism in the 1950's, there are no sharpies being built professionally now. The reason is not any fault in the design type, but material obsolescence. Sharpies have hard chines and straight sides and bottom in section. Just about all manufactured small boats are now fiberglass of course, a material which is strong on compound curved surfaces, but weaker at corners and flat surfaces. Sharpies need to be built of wood, so there will never be many of them. I just hope my boat lives up to its heritage. I can hardly wait to find out.
Monday, December 6, 2010

After a Delay, Starting the Finish Work

Chilly weather, other obligations, and a cold have kept me from doing much the last few days, but now I'm back on track. Before I can paint the inside of the boat it needs to be thoroughly sanded and all the screw holes and dings are to be filled and sanded.  I cleaned out the boat and vacuumed it yesterday, and today I started the sanding. Some areas like the forepeak will never be seen once the boat is done, so the sanding is just to provide a good surface for protective paint. But most of the inside will be what I and my crew see all the time, so it will get more care. Preparation for the finish is not the time to be impatient.

One thing which has given me a headache is the forward deck piece. It is sharply crowned, which tests the ability of the plywood to bend without breaking. The first version broke, so I made a new one with outer grain running across the boat instead of fore and aft. I also cut grooves fore and aft on the underside, to allow it to bend more easily. My boatbuilding bible says to cut such grooves close together and not over 1/3 the thickness of the plywood. With the foolish thought that more is better, I cut the grooves deeper, and sure enough it broke along a groove line when I tried to bend it to fit. Sadder but wiser, I made another piece and cut sallower grooves. But it was still so stiff I doubted it would take the bend required. Soaking it in hot water and leaving it overnight with 50# of barbell weights pushing a bend into it didn't help. So I fashioned a clamp to press it into an even bend. That seems to work, and I'll leave it like that until I'm ready to attach it permanently. Then as I install it I'll smear epoxy putty into the underside grooves to give it strength and a good seal. After I took the picture below I added two more similar clamps to bend the piece throughout its length.

Next up: more sanding.


Tuesday, November 30, 2010

Sealing with Epoxy

Starting several days ago, I planned to devote one day to sealing many parts with epoxy, and today was the day.

For a long time in the '70's I was a faithful reader of National Fisherman magazine, not because of any interest in commercial fishing, but because at that time the magazine often ran articles about wooden boat design and construction. When it eventually dropped that coverage, I seem to recall that Woodenboat magazine was the heir. Anyway, I remember reading of two brothers named Gougeon in Michigan pioneering the use of epoxy adhesives in boatbuilding. They called their system "wood epoxy saturated technique", later to become a brand name acronym WEST System epoxies. What stuck in my mind was their assertion that if you encapsulate wood in epoxy, it will last virtually forever. I don't know if that claim is true, but I do know it motivates me to seal every wood part of this boat in epoxy before painting in the hope that she will last, certainly not forever, but at least as long as I do.
So today I mixed up batches of 1:1 epoxy specially-formulated to penetrate and seal wood. I sealed the thwarts, the underside of the deck, the mast step, the top side of the sternsheets, the tabs at the top of the rudder, all the deck-coaming support blocks, the ends of the mast, and the forward-most frames which I'd trimmed to fit the coaming. I also sealed the top and bottom edges of the coaming. That type of epoxy is slow to cure, and as I write I'm hoping it hardens in time for me to put all those pieces under cover befor the forecast rain arrives tonight. If they are at least halfway hardened, rain will not hurt them, but may cause a "blush" to form on the surface which will need to be washed off.

I'm having second thoughts about the belaying pins I put in yesterday. The pins are fine, but the location is necessarily cramped. There may not be enough room between the pins and the mast to easily cleat the halyard and snotter. I may end up knocking the pins out, plugging the holes, and putting cleats or belaying pins on the frame just aft of and below the mast thwart, where there is more room.

Monday, November 29, 2010

Working on Coaming, Deck Blocks, Belaying Pins, and Red Tape

On the agenda today was to finish trimming and sanding the coaming, making blocks to reinforce the deck and coaming between frames, and make belaying pins to secure the halyard and snotter (a wonderful word: the line holding the sprit out is the snotter.) Actually, that was part of the agenda for yesterday.

I marked the coaming pieces to trim the aft ends to mate up neatly with the transom frame. The starboard coaming hadn't been trimmed to width at all, so I marked it to the designed 4 1/2". After cutting, I sanded the top and bottom edges and rounded them with the router. Because the laminated coaming pieces now have a permanent bend, running it past the router wasn't all that easy. To get them uniformly smooth and round, I followed up with hand sanding. As I was finishing that job, disaster struck. The starboard coaming broke in half at the point of one of the scarphs. I guess there was too much strain on it as I handled it for routing and sanding. As Mozart said when his father died, you can imagine how upsetting that was. Actually I think I grieved for the coaming more. I've put a lot of work into the coaming pieces, and material for a new one would be costly.  Here's the plan: when I am ready to finally glue and screw the coaming, I'll see whether the starboard side makes a fair curve if I just epoxy the two pieces together and screw them to the frames. The break is a couple of inches from where the coaming meets a frame, so it will not be easy to put a butt block behind the pieces to support them. We'll just have to see. Worst case, I pay up for new material and use the broken pieces for a pattern, but I hope it doesn't come to that.

The original plans assume the deck is built of 3/4" planks, but my deck is plywood. It's only 6mm (a scant 1/4")  thick. It is supported by the sheer clamp on the outside and by frames every 12". But I'm concerned that even though it will be fiberglassed and bonded to the coaming, there is no other support for the deck on the inside edge. So today I made enough blocks about 5" long to screw to the deck and coaming between each frame. Probably unnecessary, but I'd rather have it extra strong. After the deck and coaming are glued and screwed in, I'll also glue and screw the supporting blocks.

The plans specify a 1/2" pin driven through the mast thwart to cleat the halyard. I'll also lead the snotter to the thwart, so I need two such pins. I don't know if the designer meant the pins to be wood or metal, but 1/2" looks puny for wood, so I made 5/8" belaying pins, drilled holes for them in the thwart, and drove them in place. It's a tight fit, so they'll stay in place secured by only the normal sealing and paint. I may add similar belaying pins in the aft rowing thwart, just inside the frames so they won't get in the way. Those could be used to cleat the mainsheet or just snub it. As you can see, there was just enough room for the belaying pins between the mast and the mast clamp bolts.


Today I also measured and marked where the oarlocks should be. On my Gloucester Light Dory they are 12" aft of the aft edge of the rowing thwart, so that's where I'll put them. I'll also put oarlocks for the forward rowing thwart so a crew member could row while another steers. Or both could row. The main reason I wanted to locate the oarlocks is to plan for backing blocks under the plywood deck to hold through-bolts. The forward station oarlocks fall right between two frames, so a backing block is no problem. The aft station is right over a frame, so I'll have to make do with small blocks on each side of the frame. The oarlock sockets are on order.

Next up: apply a penetrating sealer to all these otherwise unprotected pieces I've made, in preparation for painting the inside of the boat.

I've started to look into getting a Federal Hull Identificaiton Number for the boat. Apparently it is a federal requirement for every boat, but administered by the State of Florida, which assigns a number when the boat is first registered. The problem is that registration is not required in Florida for an unpowered boat under 16' in Florida, so I'm not sure whom to call. If I register it in Florida anyway it will cost about $30 per year. Early this year, I registered our canoe in Minnesota in order to paddle the Boundary Waters, and an unpowered boat there only costs $25 for a three year registration. I could also register this boat in Minnesota if I wanted to register it at all, but for that I would need a hull ID #.  The reason I'm inclined to battle with the red tape is that without a hull ID# it may difficult for anyone to ever sell the boat because it it can't be shown not to be stolen. I just hope I don't have to come up with receipts for what I've spent building the boat. I don't have them and I don't want to know.

Sunday, November 28, 2010

A Thanksgiving photo, and Joining the Coaming


#3 son and his family visited on Thanksgiving Day, and my granddaughter showed a great interest in the boat- she knows the way to her granddad's heart. She climbed all over and then settled happily in the sternsheets. Later she insisted in taking her parents and her other grandfather to see and admire the boat. I hope she likes it as well afloat.


Although I didn't reach my goal for today, the final fit of the coaming, what I did get done went very well.

The coaming pieces were epoxy bonded together yesterday. I started today by sanding off the hardened excess goop on the edges and both surfaces.

The main project was to fit the two sides of the coaming together. Instead of just tapering their forward ends to match and screwing them together, I made a rabbeted "stem" piece for the two sides to screw into.


I dressed a chunk of tropical hardwood on the planer, to get four smooth sides square with each other.

I measured the angle at which the two coaming sides converge, 53 degrees, and set the table saw for half that, 26 1/2 degrees.


I marked how far apart the two sides were at the maximum width of my hardwood stock

and ran the wood block through the saw in each direction, giving me a pair of converging cuts at the right angle.


I left the saw set at the same angle and lowered the blade so it would just reach the first cut.
finally, still leaving the saw at 23 1/2 degrees,  I turned the stock over and sawed the remaining sides away, far enough offset to match the 12mm thickness of the coaming.
After trimming its length to the width of the coaming,
I screwed it in place
and trimmed the forward deck piece to fit around it.
Finally, I screwed the coaming in place at the transom and at alternate frames. The last steps, which I didn't get to today, will be to trim the bottom edge and round off all the edges with the router.

The today's job took six hours. There's a tradeoff between skill and patience.

Saturday, November 27, 2010

Bonding the Coaming and Deck

The first rainy day in several weeks kept me indoors yesterday; I used the time to plan the best sequence of remaining jobs.

Today, Saturday, I glued and screwed together the four pieces of each side of the coaming- an awkward and messy job I'm glad to have done. After the epoxy set up, I removed the screws.They aren't necessary for strength and, speaking from hard experience, it is much easier to fill screw holes than to grind off the protruding ends of screws.

While I was at it, I glued and screwed the butt straps into the side panels on both sides of the deck. The forward deck piece needs to be attached later.

Those jobs took longer than I expected, but I did have time left to sand the rudder and round its edges with the router in preparation for fabric and epoxy coating. The centerboard has already had that treatment, but I find that it is binding a little in the centerboard trunk so I ground down the high spots on each of its sides. That did the trick: it now slides freely in the trunk. One last finish coat of epoxy resin and it will be ready to paint.

Tomorrow's main goal is the final fit of the coaming. If it works out, it might be worth a photo.

Monday, November 22, 2010

Making the Coaming

The plans call for a 4 1/2" coaming, 3/8" thick. To make it of solid wood, I'd need two planks 15' long, and they would need to be about a foot wide to allow for the curvature of the sheerline: you don't edge-set a plank so wide and so thin. So I am laminating the coaming of two thicknesses of 6mm plywood. Each side consists of four pieces: the inside layer is an 8' piece scarphed to a shorter piece about 6' long. The outside layer is just the reverse. That way the scarphs are kept about 2 1/2'' apart.
On Saturday, before I started on the deck, I wanted to be sure I had enough plywood for the deck and for the coaming so I traced the coaming pattern onto a sheet of plywood. Today I cut out the eight pieces from that panel and made the coaming.

Starting with the port side, I put a 45 degree cut across the ends of the two aft layers, and clamped and tacked them in place. Then I put the forward outside layer in place, with its aft end tucked under the aft piece. I marked where they overlapped and made a matching 45 degree cut in the forward piece. I tacked it in place and repeated the process with the inside forward piece. As a result I had a full side piece assembled. At the bow it extended beyond the centerline, but I'd worry about that later. In the picture below, the scarphs are between the two sets of clamps.


I don't remember, when I made the transom, calculating how high to make the transom top above the deck height, but happily it is 1 3/8", which is just what the plans call for. I checked that I had positioned the coaming high enough that I could trim its top edge to that 1 3/8" height, I also checked that after I'd trimmed the top I would still have enough width to trim the bottom to the 4 1/2" specified width. It was close, but I had room enough both ways. So I screwed the four pieces together to hold them in their relative position and marked the 1 3/8" top line along the outside of the coaming. Then I removed the assembly from the boat and trimmed the top edge close to the cut line, finishing with the handheld electric planer. I scribed the 4 1/2" width to make a bottom cut line, and repeated the cut-and-plane. After the coaming was back on the boat I sighted along the top to make sure it made a fair curve and toched it up with the plane. 


I removed the port coaming and repeated the whole process on the starboard side. Now that I knew how, that side went much more quickly. But when cutting the top edge I made the mistake of cutting to the wrong side of the cut line. To compensate for that, I placed a long piece of molding along the top edge, bent it edgewise and clamped it to provide a guide for a fair line to plane to. That seems to have worked satisfactorily.

The remaining step was to reconcile the two sides where they come together at the bow. I trimmed the two pieces to meet by a process of repeatedly marking, sawing and sanding which I do not want to describe or recommend. In the end, the two sides matched up pretty well, but I plan to cut them back further to fit into a rabbeted solid piece. Such a joining piece probably has a proper name, but I don't know what it might be. I have earmarked for that piece a chunk of tropical hardwood given to me by my father long ago. After that piece is made and fit, I will fit the bow piece of deck around it.


Lots of finish work still to be done, but the only other pieces still to make besides that coaming joint are the tiller assembly and the rub rail. From having talked to a specialty lumber shop before, I expect that yellow pine may be the only available material for the rub rail. I may shop for that tomorrow

A Happy Thanksgiving to all!  Work will resume Friday.

Sunday, November 21, 2010

Building the Deck

Today's job, making and dry fitting the deck, was like many tasks which I worried about in advance, but which turned out to be pretty straightforward when I set to them. Is there a lesson there? 

I laid out plywood pieces, mainly offcuts from previous parts, over the areas to be covered, trimmed their ends to match, and tacked them down.


Then I scribed a line under the deck pieces along the chine, to give me an outside cut line. For the inside cut line, I tacked a long piece of molding, about 1/4"x1 1/2", to all the frames and up against the deck pieces. Then I reached under and scribed a line on the underside of the deck pieces along the molding. That line, of course, would be too far inboard by the thickness of the molding, which I would need to allow for. As a cross-check, I reached further inside where I could and marked along the inside of the molding. I have learned that when you do something blind, the result looks like it is made by a blind man. I learned it from painting, but it applies to scribing cut lines as well. When I pulled the pieces off to cut them, the outside lines, which I could see while drawing them, had turned out fine. And indeed the two inside lines looked like they were drawn by a blind man. Now here was a situation where my career experience could have been put to use. I could have calculated a least-squares line and have known that I had a mathematically optimum cut line. But something told me if I tried that God would punish my pride and I would end up with ruined expensive pieces of plywood. Instead, I just tacked a thin batten along the lines I had drawn, and marked a kind of consensus fair line to cut to. Naturally, that turned out to be right on.


After all the pieces were cut out I tacked them down again, marked match lines, and screwed butt straps underneath. The deck is done to the dry fit stage.


The forward piece, where the two side decks ("washboards") come together near the bow, will need to be cut out; but I won't know by exactly how much until I make the coaming and the piece near the bow where the coaming of the two sides comes together.

I plan to make the coaming tomorrow. It will be laminated of two thicknesses of 6mm plywood. Before shutting down today I tacked the coaming pattern, made previously, and verified I can rely on it as a pattern to cut out the coaming pieces. The coaming itself will provide the fair line on the inboard edge of the deck, to correct for the cutting irregularities I know I have made. Any gap remaining will be filled with thickened epoxy, and fabric will cover the deck and at least the outside of the coaming.

Saturday, November 20, 2010

Sternsheets Done, Starting on Deck

The hard part of making the sternsheets was in the planning. It took a lot of time to figure out exactly where the two cross supports should be and how to attach them there, and a bit more time to calculate how wide each of the six planks should be. but once I had the plan the work went smoothly. I ripped the planks to width, dressed them on the thickness planer, routed the edges round, and screwed them to the supports. The two outside planks were the hardest because they needed to be tapered and also cut out to fit around two frames on each side. Once screwed down, I marked and trimmed and routed the forward ends so they were even with one another. The sternsheets are done, at least to the dry fit level. They'll still need to be taken off, sealed, painted, and screwed back on. I will not glue them down, because I want to be able to get under them for cleaning and painting in the future.


I still had time today to start on the deck, beginning with the piece at the bow which must take a sharp bend to form an unusually high crown. I would have made the deck flatter, but that's what the plans call for.  To allow the plywood to bend more than it wants to I cut shallow grooves fore and aft in the foremost few inches of the underside. I screwed that piece down, despite a little groaning from the plywood, and before shutting down for the day I covered that piece with a hot wet towel, to encourage the plywood to get comfortable with the shape. Tomorrow I should be able to get the whole deck roughed in and maybe start on the coaming.


I have decided to press ahead with the final pieces (the sternsheets, deck, coaming, and rub rail) and get them all dry fit. Then I'll disassemble those pieces, paint the inside of the boat, seal the removed pieces, paint them where it will be impossible to reach once they are in their final position, then reassemble them, glass the deck and the outside of the coaming, and do the finish painting. Three reasons: I'm starting to get impatient, and want to see it all together. But more importantly, doing it that way will make it possible to do much of the sealing and painting steps at the same time, and will make it easier to get the finish and assembly steps in the right sequence.

I saw on YouTube a video of a Goat Island Skiff, not too different from this boat, showing its stuff in a strong breeze. Looks lively; I hope not excessively so. My hope is that Tugga Bugga will be a reasonably forgiving boat for grandkids to learn on and comfortable for me to sail for many years in the future. It would be an irony if Tugga Bugga turns out to be fast but tender: our old FJ had those qualities, and that was the reason I sold it and started this project in the first place.

Anyway, it's good to be thinking about what happens after the boat is built, besides sailing her. I haven't finally decided how she will be stored; could be at anchor for short periods, maybe kept on a davit, maybe hauled up on a roller ramp which would need to be built. Will I want a trailer? How about a cockpit cover?

Thursday, November 18, 2010

Right Side Up and Back at Work

After a ten-day trip out of town, I was able to resume boatbuilding this week.

The bottom and topsides are done, except of course for a little touchup when everything else is complete. On Tuesday, with the help of Mrs. Strongback, I turned the boat over to work on the inside, but got no other work done. The waterline makes it easier to see now how the boat will look in the water.


On Wednesday I got three projects moving along.

After having fiberglassed the topsides, not much excess fabric and epoxy remained along the sheer because I had sliced it off with a razor before it hardened, but what there was I sanded off, leaving the sheer smooth.

I carefully drilled a 1/2" hole through the stem for a painter line, but also low enough to provide a good point from which to tow the boat, if I ever do that. The next time I seal something with epoxy, I'll swab that hole with sealer also.

Before leaving on the latest trip, I had glued and screwed the rudder assembly together. On Wednesday I cut out the finished edge lines with a jigsaw, and tapered the trailing edge, using a power plane and belt sander.

Today, Thursday, I spent a crazy amount of time calculating and measuring for placement of a couple of details. After getting the boat level fore and aft, I started placement of the supports for the stern sheets, the seat at the stern. According to the plans, the sternsheets are not level, but rather slope down from the stern at 3 degrees.
One unusual tool I have is a brass adjustable level which can be set to any angle desired. I had it for years as a desk ornament when I was gainfully employed, but never knew its history or purpose until a customer identified it as a WWII-era artillery clinometer. He explained that it was set for whatever elevation angle was called for by the gunnery officer, and held on the gun's barrel while the gun was raised or lowered until the "clino" showed level. Then it was taken away before the gun was fired, lest it be shaken and broken.

There are not many applications for a level which you deliberately set to an angle other than level, but it was just what I needed to measure the 3 degree slope and mark where the forward support for the sternsheets should be attached to the frames on each side. I dressed a piece of pine with the thickness planer, cut it to the right angle for the flare and narrowing of the sides, and gradually cut it down until it fit against the sides, right at the desired height. I clamped the piece in place.

The other angle I fussed over was the placement of the mast step. Once permanently installed, it will not be adustable, so I will screw it down temporarily at my best guess of the right place, and maybe adjust it after the boat is rigged. The mast is to rake aft at 12.25 degrees, according to the plans. So I measured down from the mast thwart to the bottom at that angle, over and over, and marked where the step should initially be. It turns out the step needs to be farther forward that the narrowing of the bow permits, so I trimmed off the forward corners to give it more room.

Here's a picture of my small gains of the last two days. Yes, I know, if I don't pick up the pace I'll grow old and die before the boat is finished:

Wednesday, November 3, 2010

Hull Finished!

Over the last two days I finished painting the topsides and bottom, so hull is officially complete.


Yesterday I printed the name onto the dull side of photo paper and cut out the letters with an X-acto knife, producing a template which I then traced onto the transom and painted. It makes a good way to put the name on the boat, short of hiring a signpainter.  The photo makes it looks crooked, but it isn't.


Today I assembled, glued and screwed the rudder. It's a sandwich, with 6mm plywood the bread and 3/4" pine as the meat. It's messy and ugly; I'll post a photo when it's trimmed and shaped. The rudder will a covering of epoxy and polyester fabric.

I'll be going out of town for ten days starting Friday. When I get back it will be time to turn the boat over and work on finishing the inside. It doesn't hurt to leave the topside paint to cure for a while. It dries fast but takes a month to fully cure. Meanwhile, it is satisfying to have the hull finished. Doesn't look bad, either.

Sunday, October 31, 2010

Topsides Finished

The second and third coats of paint went on the topsides today; it dries almost as fast as I put it on. Later I downloaded a font I liked and printed a pattern for the name. For fun I cut it out and pasted it to the transom. The photo is inverted, of course:


The next step will be to re-tape the waterline over the white, and paint the bottom. It will be a red anti-fouling paint, although I do not expect to leave the boat in the water much. Maybe before the end of the week (another trip out of town) I'll be able to flip the boat and work on the inside again.

Saturday, October 30, 2010

Science, Technology and Topside Paint


In my last post I bragged of striking a waterline on one side by simply moving along the side with a spirit level and a pencil. That claim, to use a Watergate-era phrase, is no longer operative. That approach produced a nice fair line, but not a level one. It took me a while to figure out why. The topsides flare out, so a level placed against the topside will give a reading perpendicular to the "fall line" on the side. It will be level only at that point. Any other point marked on the spirit level will be closer to the chine, and not level to the ground. If that sounds counter-intuitive, trust me. When I sighted along the resulting waterline to the horizon, the difference was obvious; it would have been even more obvious in the water.

Technique #2: I tried a water level. The idea here is to use a long clear plastic tube full of water, fix one end to a reference point, and move around the side marking the level of the visible water in the other end of the hose, taking advantage of the fact that water seeks its own level. The science is perfect. Applying the science is a complete failure. Can you guess why? Every time I moved the hose, the change in its shape affected the volume inside the hose slightly, and moved the water up or down both ends significantly. You wouldn't think so, but it did. A water level would work, but only with two people working together. One would monitor the reference point and call out up, down, and mark. Other problems with a water level are bubbles of air, which must be carefully flushed out, and the drops of water in the ends of the hose, which can run down and join the main column of water, changing its level. All in all, good science but poor technology.

Technique #3, which I did not try: A laser level, which I don't have, would work well set up to the side and panned from bow to stern, once the boat were levelled precisely fore and aft and side to side.

Technique #4: Do it the way the book says. Erect two horizontal boards across the bow and stern at the height of the desired waterline. stretch a string between the boards, and where it just touches the boat is the waterline at that point. Move the string around to create a series of points, and finally connect the points. Again, the science is indisputable. The problems in real life are daunting: the two boards must be perfectly straight, which no board ever is; the points at the bow and stern where the waterline should end must be exactly at the same level as each other; the boat must be perfectly level side to side; and the boards at the ends must be at precisely the same height as the boat. It is hard to get it all right at once, and hard to keep it that way while working. Nevertheless, with Mrs. Strongback's assistance, I finally struck a satisfactory waterline that way. In the picture below, look how the blue tape lines up with the horizon in the background. Not perfect, but what is?


It took two full days and half a roll of masking tape to get the waterline right, but only 20 minutes to put on the first coat of topside paint.
If I were a boatbuilder, I'd have been fired long ago for lack of production. As it is, I'm having fun. It is time very well spent.

Thursday, October 28, 2010

Not a Cello

I remember many years ago my Dad describing the beautiful old Dragon class boats as being built "like musical instruments." That mental image was so vivid it stuck with me, and I thought about it yesterday while sanding out the latest coats of epoxy.

The bottom and topsides were fair and pretty much smooth: no drips, runs, sags or bumps. The plywood butts were imperceptibe. It did have a sprinling of small slightly low spots, typically about 1/4" across. More epoxy and sanding alone wouldn't get the surface perfectly smooth. I would need to spread a mixture of epoxy thickened with glass microballoons, and then sand that fair. From experience I know that once you spread a putty mixture like that it is easy to sand it smooth but a long and aduous job to get the surface fair again, with no assurance of success. So I considered how smooth I needed to get it. If I were building a plug for a fiberglass mold, the answer would be that nothing less than perfection would do. If I were building to a "Dragon" standard, well, I fell short of that long ago. Since the boat I'm building is in the tradition of humble workboats- not a cello- it is obvious the goal should be a good workmanlike level of finish, but no fancy stuff or pretense of perfection.

From having dabbled in model building years ago, I know that for a job to look right, it needs a consistent level of finish. If one part is rough and another highly and precisely detailed, the whole thing looks bad.  It makes sense that the same principle would apply to actual boats, though I've never heard it explicitly mentioned. For that matter, I'd expect that artists try to do the same thing. Anyway, it was easy to convince myself to call a halt to finishing the hull's exterior.

Also yesterday, I struck a waterline on the hull.As I mentioned in an earlier post, I have read about many techniques for doing that. When it came time to do it, I didn't follow any of them. I simply levelled the boat fore and aft and athwartship, located the waterline at the stern from the plans, and used a small spirit level to work my way forward, marking every six inches or so, and checking as I went by sighting across the bay to the top of a seawall 1000' feet away. When I reached the bow, the line I'd drawn was less than 1/4" from where I'd guessed it would be- success. Now I can either repeat the process on the other side or just measure and match what I've already done. With the waterline drawn, I can tape it and paint the topsides and bottom. That will be worth a photo. Once the exterior is painted, the boat will be turned back over and work can resume on the inside.

Last Sunday I happened to notice a classified ad for a solid brass 9# anchor. I got a careful description over the phone and bought it sight unseen. It's about 25 mi. north of here, and I'll pick it up next Friday on my way out of town for a ten-day trip. I hope the anchor is not a disappointment, but don't have much invested in it in any case.

Tuesday, October 26, 2010

Building Up a Finish on the Hull

Tuesday, 10-26:

No time for boatbuilding yesterday, but today I coated the hull with epoxy, and added another coat after the first one initially set up. According to the West System technical manual, as long as epoxy is "plastic", not hardened, additional epoxy will bond to it chemically; so today I was able to get two coats on without sanding in between. It's possible that I won't need any more coats to get a smooth finish. I won't know until it is fully cured and sanded.

A couple of days ago I copied all the previous posts to a .doc file so I'll have a permanent record of the project. I screened the file with a spell checker; it was surprising and humbling to see how many typos and straight out spelling errors I had made. They will remain uncorrected on the posts themselves. Since it gives me a nice warm feeling when I notice other people's grammar and spelling errors, I'm glad to be a source of similar pleasure for others.


Sunday, October 24, 2010

Sanding...

…and more sanding:
Sunday, October 24, 2010
After two weeks out of town, I got back to work today.
Before I left I had put a second coat of epoxy on the bottom and topsides. At least one more coat will be needed before the weave of the fabric disappears and the surface is smooth and fair, but the quality of the final finish depends more on patient sanding rather than just more epoxy. So today I spent four hours repeatedly going over the hull with an orbital sander and a belt sander; and hand sanding the corners.

If you are curious what a sanded hull looks like, I offer this photo along with my best wishes for more excitement in your life.

Friday, October 8, 2010

Steps Done and Begun, Sail Received, and a Hiatus

Friday, Oct. 8

I put the sixth and final coat of varnish on the mast and sprit this morning. The spars are done, except (there will always be excepts) I have left the mast a few inches long until now, to facilitate varnishing. Now I can trim it off and varnish the truck.


After sanding yesterday's filled spots, the hull was ready for...


... the first of the finish coats of epoxy. This will be sanded and reapplied until either it's absolutely smooth or I say "enough already." 


While I was working, the sailmaker called to let me know the sail was finished. So after the epoxy coat was done I drove down to his loft to pick up the sail. I used a local sailmaker, Keith Donaldson, who goes by Advanced Sails, but it's a one-man loft. Although he has many years of experience, this sail is a first for him in several respects: a sprit rig, a quadrilateral sail in that there is a club at the clew, a luff which laces to the mast, and a vertical line of reef points. He took a lot of interest in the sail, and he is curious how it will perform. Of course, so am I. I am well pleased with the job he did, and can recommend him, especially for a job which is out of the ordinary and calls for professional attention and interest on the part of the sailmaker. Here's the sail. The attractive woman in the background is Mrs. Strongback.


And now work wil halt for a couple of weeks while we take a trip.


Thursday, October 7, 2010

More Sanding and Filling

Thursday, Oct. 7

No way to make the last few days sound more interesting than they have been. Both bnilding up a varnish finish and fairing a hull just take patience and persistence.

It takes about an hour to sand and varnish the spars. I put coat five on the mast and sprit, and the final coat six on the club.

I decided to adapt the tiller from Maris Stella, the family boat of my childhood. It is the right size as long as I extend the part over the top of the rudder with stainless steel straps. It has the right downward bend, and it is already in beautiful condition. I refinished it for no particular reason last year, and today I gave it one more coat of varnish. Its connection with happy memories will be a pleasure, and I am willing to not make a new tiller from scratch. Maybe I can use the time saved to make oars instead. Here's the tiller:


On the hull, I sanded all the spots I filled yesterday, then went ahead and sanded and vacuumed the rest of the hull, then refilled any spots that needed re-doing. Next ahead: sand all those re-do spots and coat the hull with slightly thickened epoxy.