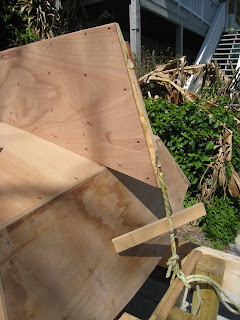
Last Saturday I finished rounding and sanding the lower edge of the skeg, and I screwed it in place temporarily. I held it in place with a “Spanish Windlass” (a twisted rope- very effective and precise way to hold a piece in place under tension.) I deliberately left the aft end long.for the moment.
Using the thickness planer on loan from a friend, I planed down the oak piece intended for the sternpost until it was exactly the same thickness as the skeg. I cut out the sternpost and marked the skeg where it needs to be trimmed off to mate with the sternpost.
On Sunday I trimmed off the skeg and permanently attached it with screws and epoxy. . This time I used a double Spanish Windlass, to hold it down, and also straight up. After the epoxy cured, I found that the skeg was a little out of plumb; I will have to correct that when I mount the sternpost.
We had houseguests for a couple of days, and the next chance at boatbuilding was Tuesday afternoon. The entirety of the work I got done that day was to drill three screw holes, but it took me about three hours to do it! The sternpost is 4 ½” wide. So how do you fasten it on edge to the aft end of the keel. The traditional method would be to drill long holes in the sternpost and skeg and drive long iron “drifts” through both. Forget that; I haven’t the tools, materials or technology to do that. What I finally did was buy the longest screws I could find (4”), drill ½” holes most of the way through the aft side of the sternpost and smaller pilot holes the rest of the way through. Then when the screws are driven in, there will be about 2 ¾” of threads left to go into the skeg. Simple enough in concept, but the holes had to be drilled very carefully to keep them on center. 4” is a long way to drill straight. By setting up a makeshift guide for the drill bits, I was able to get the exit holes centered just right.
Wednesday was taken up with other activities, but today, Thursday, I wrapped up this phase of the project. I planed and sanded the mating edges of the skeg and sternpost so they made a satisfactory joint. I drilled pilot holes into the skeg to match the screw holes in the sternpost, and screwed the sternpost to the skeg. To straighten it for being out of plumb, I used a Spanish Windlass once again to pull it in line, and screwed through the transom into the sternpost where it lies along the transom, right on the center line where it should be. Everything checked out so I took out all the screws, applied epoxy and screwed the sternpost on permanently. One last straightening adjustment needed to be done. Sighting along the side of the sternpost and the side of the skeg, they were a little out of plane. So I used a clamp to twist the sternpost straight. When the epoxy sets, I should have a straight, strong skeg and sternpost. I will add more large screws from the inside into the skeg after I put in the keelson inside. The only jobs remaining on the skeg and sternpost will be to round off the bottom edge of the sternpost in line with the skeg, and to epoxy ½” dowels into the screw holes. The next step will be to add an outer stem. We are approaching the time when the exterior of the hull is done. I think I’ll seal it with a penetrating coat of epoxy before turning it over and working inside.


No comments:
Post a Comment